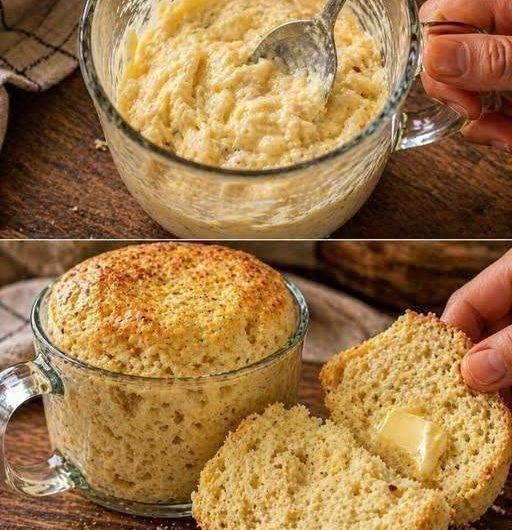
One of the biggest advantages of microwave mug bread is how little time it takes to prepare. When you want a bread substitute without making an entire loaf, this single-serving recipe offers a practical solution. Almond flour provides the main flour base, while coconut flour helps absorb moisture and gives the batter more structure. Egg holds the ingredients together, and melted butter adds richness and tenderness. Baking powder helps the bread rise during cooking, creating a lighter texture than a mixture without a leavening agent. Because the recipe uses a microwave instead of a conventional oven, it is especially useful for people who live in small spaces, have limited kitchen equipment, or want a quick alternative to store-bought low-carb bread.
Ingredients for Easy Keto Mug Bread
This recipe uses a short list of everyday ingredients that are commonly available in supermarkets. You will need one large egg, melted butter, finely ground almond flour, coconut flour, baking powder, and salt. Optional additions include shredded mozzarella or cheddar, garlic powder, and dried parsley or Italian herbs. Each ingredient serves a purpose in the final texture and flavor. Almond flour gives the bread its base, while coconut flour absorbs some of the liquid from the egg and butter. Butter contributes moisture and a rich taste, and the egg provides structure. Baking powder supports a small amount of rise, while salt balances the flavor. Cheese and seasonings are optional, so you can keep the bread plain for breakfast or add savory flavors for sandwiches and side dishes.
Choosing the Right Flour for Keto Bread
Almond flour and coconut flour behave differently from regular wheat flour, so using the specified amounts is important. Finely ground almond flour produces a more even crumb and helps the finished bread hold together when sliced. Coarse almond meal may create a grainier texture and can make the bread more fragile. Coconut flour absorbs liquid efficiently, which is why this recipe uses a smaller quantity than almond flour. Increasing either flour without adjusting the other ingredients can make the bread dry, dense, or crumbly. For the most reliable result, measure both flours carefully and use the quantities listed in the recipe card. If you follow a ketogenic or low-carbohydrate eating plan, check the nutritional information on your flour packaging because carbohydrate values can differ between brands.
Why Eggs and Butter Matter
Egg and butter form the moist base of this quick microwave bread. The egg supplies structure and helps the mixture set as it cooks, while melted butter contributes richness and helps prevent the crumb from becoming excessively dry. Whisking the egg thoroughly before adding the dry ingredients is important because unevenly mixed egg can leave parts of the bread with a stronger egg flavor or inconsistent texture. Melt the butter before mixing, but allow it to cool slightly if it is very hot. This helps prevent the egg from beginning to cook before the mug goes into the microwave. Once the egg and butter are combined, the remaining ingredients can be mixed in until the batter is evenly blended.
How to Make Mug Bread in the Microwave
Begin by choosing a wide, microwave-safe mug or a small ramekin. A wider container generally produces a flatter bread that is easier to remove and slice. Lightly grease the inside with butter or a little cooking oil to reduce sticking. Add the egg and melted butter, then whisk with a fork for approximately 20–30 seconds, until the yolk and white are fully combined. Next, add the almond flour, coconut flour, baking powder, and salt. Include garlic powder and dried herbs if you want a savory flavor. Stir until the mixture forms a thick, even batter without obvious pockets of dry flour. If you are using shredded mozzarella or cheddar, fold it into the mixture at this stage.
Let the Batter Rest Before Cooking
A brief resting period helps the coconut flour absorb some of the moisture in the mixture. After stirring the batter, leave it undisturbed for 10–15 seconds before cooking. The consistency may become slightly thicker during this short pause, which is normal. The batter should still look moist rather than dry or crumbly. There is no need to leave it standing for several minutes because the recipe relies on baking powder for a quick rise during microwave cooking. Avoid adding extra flour simply because the mixture appears softer than conventional bread dough. This is a batter rather than a kneadable dough, and its moisture helps the bread cook into a tender texture.
Microwave Cooking Time and Doneness
Place the prepared mug in the microwave and cook on HIGH for approximately 75 seconds as a starting point. The total cooking time may vary depending on your microwave’s power, the width and depth of your container, and the temperature of the ingredients. Check the center after the initial cooking period. If the bread looks set, feels firm, and springs back slightly when gently pressed, it may be ready. If the center is still wet or the egg mixture has not fully set, continue microwaving in 10–15-second intervals. Avoid cooking it for much longer than necessary because overcooked egg-based bread can become rubbery or dry. Make sure the center is fully cooked before eating, and use a food thermometer if you need to verify doneness.
Resting and Removing the Bread
Once the mug bread is cooked, carefully remove the container from the microwave because it may be very hot. Allow the bread to rest for 30–60 seconds before trying to remove it. This short resting period gives the structure time to settle and makes the bread easier to handle. Run a small knife around the inside edge of the mug to loosen any parts that may have stuck. Turn the mug carefully or lift the bread out with a spoon or small spatula. If the bread resists coming out, avoid pulling it apart forcefully. A lightly greased container and a short cooling period usually make removal easier. Once released, place the bread on a cutting board and slice it horizontally if you plan to toast it or make a sandwich.
How to Get a Better Bread Texture
Microwave bread is naturally softer than conventional oven-baked bread, but a simple extra step can improve its texture considerably. After the bread has rested and been removed from the mug, cut it horizontally into two pieces. Toast the slices in a dry frying pan for approximately 1–2 minutes per side, checking frequently until the surfaces are lightly crisp. You can also use a toaster if the slices are firm enough to handle safely and will not fall apart inside it. Toasting helps create a more bread-like exterior while keeping the center soft. It also makes the slices easier to hold when preparing breakfast sandwiches, cheese sandwiches, or avocado toast. For a richer finish, spread a small amount of butter over the warm bread after toasting.
Savory Garlic and Herb Mug Bread
If you prefer a savory bread alternative, garlic powder and dried herbs are easy ways to add flavor without changing the basic method. Garlic powder provides a familiar garlic-bread taste, while dried parsley or Italian herbs contribute an aromatic finish. You can include the optional seasonings in the batter before microwaving so their flavor is distributed throughout the bread. For a cheesy version, fold in the specified tablespoon of shredded mozzarella or cheddar. The cheese melts during cooking and gives the bread a richer flavor. For additional variations, you may use the suggested garlic powder, Italian seasoning, grated Parmesan, sesame seeds, or a little butter after cooking. Treat these as optional serving or flavor suggestions rather than required ingredients, and remember that extra additions can change the nutritional values.
How to Serve Low-Carb Mug Bread
This single-serving bread can be used in many of the same ways as a small slice of conventional bread. For breakfast, toast it and top it with butter, avocado, or a cooked egg. You can also use the two halves as a base for an egg-and-cheese sandwich. At lunchtime, try filling it with tuna, cooked chicken, or your preferred sandwich ingredients. Its savory version can accompany soup, scrambled eggs, or a simple salad. If you make the bread with garlic powder and herbs, it can also serve as a quick side for a meal that would usually include garlic bread. For mini burgers, use a wider ramekin to produce a flatter shape that is easier to cut and fill.
Is Keto Mug Bread Suitable for a Low-Carb Diet?
This recipe is designed as a low-carbohydrate bread alternative because it uses almond flour and coconut flour instead of conventional wheat flour. However, low-carb does not mean carbohydrate-free. Both types of flour contain carbohydrates, and the final nutritional values depend on the quantities used, the particular brands, and whether optional cheese or seasonings are included. If you follow a ketogenic diet, check the nutrition labels on your ingredients and calculate the net carbohydrates using the method appropriate for your location and dietary needs. The recipe contains egg and dairy ingredients, and almond flour is made from tree nuts, so it may not be suitable for everyone with food allergies. Anyone following a medically prescribed diet should use nutritional information that matches their actual ingredients and serving size.
Common Mistakes to Avoid When Making Microwave Mug Bread
The most common problem is overcooking. Microwave ovens can cook small portions quickly, and even an additional 20–30 seconds may affect the texture. Begin with approximately 75 seconds and extend the cooking time only when the center needs it. Another mistake is using coarse almond meal instead of finely ground almond flour, which can result in a grainier, less cohesive bread. Skipping the baking powder may also produce a denser result because the mixture loses its main leavening ingredient. Poorly whisked egg can create an uneven crumb, so combine the egg and butter thoroughly before adding the flours. Finally, remember to grease the mug and allow the cooked bread to rest briefly. These small steps help improve consistency and make the finished bread easier to remove and slice.
Notes for the Best Results
Use a wide, microwave-safe mug or small ramekin, and lightly grease the interior before adding the batter. Measure the almond flour and coconut flour accurately because their absorption properties are different. Whisk the egg until smooth, and mix the dry ingredients thoroughly to avoid pockets of flour or baking powder. Start with approximately 75 seconds on HIGH, then check the center and add short cooking intervals if necessary. Rest the bread for 30–60 seconds before removing it. For a less eggy flavor and a crispier finish, slice and toast it after cooking. If you add cheese or seasonings, mix them in before microwaving. The recipe is best eaten fresh because the small portion can lose moisture as it cools. Always handle the hot mug carefully and confirm that the center is fully cooked before serving.
Frequently Asked Questions About Keto Mug Bread
Can I make keto mug bread without an oven? Yes. This recipe is specifically designed for microwave cooking, so no conventional oven is needed. How long does it take to cook? Begin with approximately 75 seconds on HIGH, then add 10–15 seconds if the center remains wet. Why is my mug bread rubbery? It may have cooked for too long, or the microwave may be particularly powerful. Shorter cooking intervals can help prevent this problem. Can I leave out the cheese? Yes. Cheese is optional and can be omitted without changing the basic ingredient list. Can I make it ahead of time? The bread is generally best fresh, but you can prepare it shortly before serving and toast it just before eating. Can I use it for sandwiches? Yes. A wide mug or ramekin produces a flatter shape that is easier to slice horizontally. Is it completely carb-free? No. Almond flour and coconut flour contain carbohydrates, so the bread should be described as low-carb rather than zero-carb.
When you need a quick alternative to traditional bread, this keto mug bread recipe offers a simple way to prepare one portion without kneading dough, waiting for yeast, or heating a full-size oven. The combination of almond flour, coconut flour, egg, and butter creates a tender base that can be served plain or customized with cheese, garlic, and herbs. The microwave makes preparation convenient, while a short resting period and a quick toast in a frying pan help improve the final texture. Use the listed ingredient quantities, monitor the cooking time carefully, and adjust only the optional flavor additions to suit your preferences. Whether you serve it with breakfast, turn it into a small sandwich, or enjoy it alongside soup, this quick low-carb mug bread is an easy recipe to keep on hand for busy days.
Description: A quick, soft microwave mug bread made with almond flour, coconut flour, egg, and butter. This easy single-serving recipe takes only a few minutes to prepare and can be enjoyed plain, toasted, or flavored with cheese and herbs.
Preparation Time: 2–3 minutes
Cooking Time: 60–90 seconds
Resting Time: 30–60 seconds
Total Time: Approximately 4–5 minutes
Servings: 1 mug bread
Ingredients
- 1 large egg
- 1½ tablespoons melted butter
- 2 tablespoons finely ground almond flour
- 1 tablespoon coconut flour
- ½ teaspoon baking powder
- ⅛ teaspoon salt
- 1 tablespoon shredded mozzarella or cheddar (optional)
- ¼ teaspoon garlic powder (optional, for savory bread)
- A pinch of dried parsley or Italian herbs (optional)
Step-by-Step Instructions
Step 1: Prepare the Mug
Choose a wide, microwave-safe mug or small ramekin. Lightly grease the inside with butter or a little cooking oil to help prevent sticking.
Step 2: Mix the Wet Ingredients
Add the egg and melted butter to the mug. Whisk with a fork for 20–30 seconds until the yolk and egg white are fully combined.
Step 3: Add the Dry Ingredients
Mix in the almond flour, coconut flour, baking powder, and salt. Add garlic powder and dried herbs if desired. Stir until the batter is thick and evenly mixed. Fold in the shredded cheese if using.
Step 4: Rest the Batter
Let the batter stand for 10–15 seconds to allow the coconut flour to absorb some moisture.
Step 5: Microwave the Bread
Cook on HIGH for approximately 75 seconds. Check the center, and if it remains wet, continue cooking in 10–15-second intervals until fully set.
Step 6: Cool and Remove
Carefully remove the hot mug from the microwave. Rest the bread for 30–60 seconds, run a small knife around the edge, and gently remove it from the mug.
Step 7: Slice and Toast
Slice the bread horizontally. Toast in a dry frying pan for 1–2 minutes per side, or use a toaster if the slices are firm enough. Serve warm.
Serving Suggestions
- Serve with butter or avocado for breakfast.
- Use as the base for egg-and-cheese sandwiches.
- Fill with tuna or cooked chicken for a quick lunch.
- Add garlic and herbs for a savory side dish.
- Serve alongside soup, eggs, or a salad.
Notes
- Use finely ground almond flour rather than coarse almond meal for a smoother texture.
- Do not skip the baking powder if you want a lighter result.
- Avoid overcooking, as the egg can become rubbery.
- Toasting after microwaving gives the bread a firmer exterior.
- Cheese and seasonings are optional and may affect the nutritional values.
- The bread is best enjoyed fresh.
- Make sure the center is fully cooked before eating.
Nutritional Information
Estimated nutrition per serving (one mug bread, without optional cheese or seasonings):
- Calories: approximately 340–390 kcal
- Protein: approximately 9–12 g
- Total carbohydrates: approximately 5–8 g
- Dietary fiber: approximately 2–4 g
- Net carbohydrates: approximately 3–5 g
- Fat: approximately 32–37 g