Sourdough discard brownies are a delicious way to use leftover sourdough starter while making a rich, chocolatey dessert from simple baking ingredients. These homemade brownies have a soft, fudgy center, a delicate crackly top, and deep chocolate flavor that makes every bite satisfying. Unlike traditional brownies, this recipe includes sourdough discard, which adds moisture and a subtle tang that balances the sweetness of the chocolate and sugar. You do not need an active sourdough starter or a complicated baking process to make them. With melted butter, dark or semi-sweet chocolate, cocoa powder, eggs, and a little flour, you can prepare a batch of bakery-style brownies in your own kitchen. Whether you bake regularly or are looking for a creative sourdough discard recipe, these brownies are an excellent choice for family desserts, weekend treats, potlucks, and chocolate cravings.
What Makes Fudgy Sourdough Brownies Different?
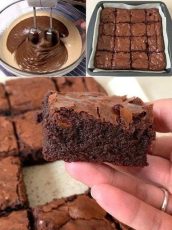
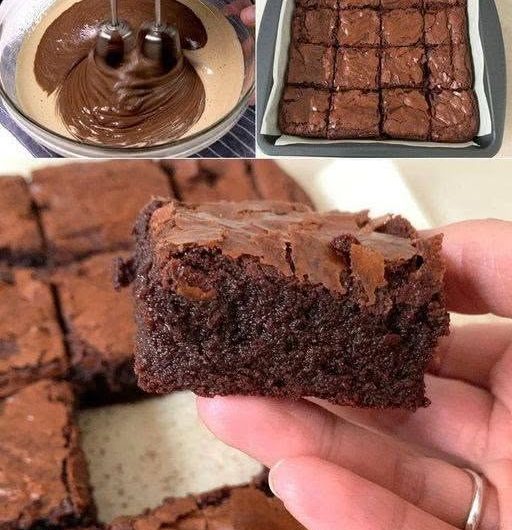
The best fudgy sourdough brownies have a dense texture, a moist interior, and a concentrated chocolate flavor. This recipe combines melted chocolate with unsweetened cocoa powder to create layers of chocolate richness without relying on excessive flour. Butter contributes a smooth, tender texture, while granulated sugar and light brown sugar work together to provide sweetness, moisture, and a pleasant chew. Eggs help bind the ingredients and create structure, while whisking them with the sugars helps develop the shiny, delicate crust that many brownie lovers enjoy. Sourdough discard adds another layer of moisture and a mild tang, making the chocolate taste more balanced. The result is a brownie that feels indulgent without requiring specialty equipment, unusual ingredients, or advanced baking techniques. Each square delivers a satisfying contrast between the slightly crisp top and the soft, chocolate-filled center.
Why Use Sourdough Discard in Brownies?
Sourdough discard is the portion of sourdough starter removed during regular feeding to maintain a manageable amount of starter. Instead of throwing it away, you can use it in many recipes, including pancakes, muffins, crackers, cakes, and brownies. In this chocolate brownie recipe, the discard contributes moisture and a subtle fermented flavor that complements the sweetness of the other ingredients. Because brownies do not depend on yeast or sourdough fermentation for their rise, there is no need to wait for the batter to ferment or the brownies to proof. The discard functions primarily as an ingredient that contributes moisture and flavor. For the most predictable results, use a standard 100% hydration sourdough discard, which contains equal weights of flour and water. This helps maintain the intended batter consistency and prevents unnecessary adjustments to the flour or liquid ingredients.
Ingredients for the Best Chocolate Sourdough Discard Brownies
Choosing the right ingredients is important when making homemade sourdough discard brownies. Unsalted butter provides richness, while semi-sweet or dark chocolate creates a smooth, intense chocolate base. Granulated sugar encourages sweetness and helps develop the crackly crust, and light brown sugar contributes moisture and a slightly caramel-like flavor. Two large eggs provide structure and help the batter hold together. Vanilla extract rounds out the chocolate flavor, while sourdough discard adds moisture and a gentle tang. Unsweetened cocoa powder intensifies the chocolate taste, and all-purpose flour provides enough structure without making the brownies cake-like. A small amount of salt enhances the sweetness and balances the rich chocolate. Chocolate chips or chunks are optional, but they are a welcome addition if you enjoy pockets of melted chocolate throughout each square. Measuring the ingredients carefully helps produce consistent results.
Choosing the Right Chocolate and Cocoa Powder
Chocolate quality can make a noticeable difference in the flavor of homemade brownies. Semi-sweet chocolate offers a balanced combination of sweetness and cocoa intensity, while dark chocolate creates a deeper, more pronounced chocolate taste. Chocolate containing approximately 50–70% cocoa is a good choice for this recipe because it provides richness without making the brownies excessively bitter. Finely chopping the chocolate allows it to melt more evenly with the butter, producing a smooth mixture that blends easily into the eggs and sugar. Cocoa powder also plays an important role in the final result. Dutch-process cocoa has a smoother, more mellow flavor, while natural cocoa powder generally offers a sharper chocolate taste. Either option can be used according to your preference. For the most reliable texture, use unsweetened cocoa powder and avoid substituting it with sweetened drinking chocolate, which contains additional sugar and other ingredients that can change the balance of the recipe.
Understanding Sourdough Discard Hydration
Sourdough starter hydration refers to the relationship between the amount of water and flour in the starter. A 100% hydration starter contains equal weights of flour and water, making it a common consistency for many home sourdough bakers. This recipe is designed around sourdough discard with that hydration level, so using the recommended type helps the batter turn out as intended. If your discard is unusually thick, the brownies may be slightly denser. If it is especially thin, the batter may have more moisture than expected. Stirring the discard before measuring helps distribute the flour and liquid evenly, making it easier to measure a consistent portion. There is no need to add extra flour simply because the discard appears moist. The recipe already accounts for the moisture contributed by standard sourdough discard, and unnecessary flour can make the finished brownies dry instead of soft and fudgy.
Essential Equipment for Baking Brownies at Home
You do not need an elaborate collection of baking equipment to make these sourdough brownies successfully. An 8-inch square baking pan is the recommended size because it helps produce brownies with a satisfying thickness and a soft center. A metal pan generally heats efficiently and can encourage evenly baked edges, while a thick glass dish may behave differently and affect baking time. Parchment paper is particularly useful because it prevents sticking and allows you to lift the brownies out of the pan after cooling. You will also need a heatproof bowl for melting the chocolate and butter, a large mixing bowl for the eggs and sugar, a whisk, a flexible spatula, and measuring equipment. A kitchen scale is especially helpful for measuring flour accurately. A sharp knife makes it easier to cut clean squares once the brownies have cooled completely. Preparing everything before you begin makes the baking process smoother and more enjoyable.
Preparing the Baking Pan and Oven
Start by preheating the oven to 350°F (175°C), allowing enough time for it to reach the correct temperature before the brownies go inside. An accurately heated oven helps the edges set while the center remains moist. Line an 8-inch square baking pan with parchment paper, leaving some overhang along two opposite sides. These extra pieces act as handles, making it easier to lift the cooled brownies from the pan without breaking them. If the parchment does not sit flat, a small amount of grease can help hold it in place. You can also lightly grease the exposed sides of the pan if necessary. Preparing the pan first prevents you from having to handle the thick batter while the oven is already hot. Once the pan is ready, set it aside and prepare the chocolate mixture. This simple preparation step makes the later stages easier and helps the brownies release neatly after baking.
Melting Butter and Chocolate for a Smooth Batter
The first major step in developing a rich chocolate flavor is melting the butter and chopped chocolate together. Place both ingredients in a heatproof bowl and warm them in the microwave in 20-second intervals, stirring between each interval. Short heating periods reduce the chance of scorching the chocolate and help the butter distribute the heat evenly. Alternatively, place the bowl over a saucepan of gently simmering water, ensuring the bottom of the bowl does not touch the water. Stir until the mixture becomes smooth and glossy, then remove it from the heat. Allow the chocolate mixture to cool for a few minutes before adding it to the eggs. It should remain fluid enough to mix easily but should not be piping hot. Excessive heat can partially cook the eggs and create an uneven batter. Properly melted chocolate gives the brownies a smooth foundation and helps produce their signature dense, fudgy texture.
Whisking Eggs and Sugar for a Crackly Brownie Top
The shiny, crackly surface of a brownie is one of its most appealing features. To encourage this texture, combine the granulated sugar, light brown sugar, and room-temperature eggs in a large bowl. Whisk the mixture for approximately two to three minutes, until it looks slightly thicker and glossier. This process helps the ingredients combine thoroughly and incorporates some air without turning the mixture into a cake-like foam. Add the vanilla extract and whisk until evenly distributed. Room-temperature eggs are useful because they blend more readily with the other ingredients and reduce the temperature difference when the melted chocolate is added. Although a crackly crust depends on several factors, including sugar, mixing, and baking conditions, this stage can help create the delicate top that many people associate with classic fudgy brownies. Take a little time to whisk properly, but avoid unnecessary extra mixing once the mixture has reached the desired consistency.
Combining the Chocolate Mixture with Sourdough Discard
Once the egg and sugar mixture is ready, slowly whisk in the cooled melted chocolate and butter. Stir until the mixture becomes uniform, with no visible streaks of plain egg mixture. Add the sourdough discard and mix again until smooth. The discard should be stirred before measuring to distribute its flour and moisture evenly. If it has been stored in the refrigerator, it can be used cold, although allowing it to sit briefly at room temperature may make mixing a little easier. The important point is to avoid adding chocolate that is too hot, since excessive heat can affect the eggs and produce an inconsistent batter. At this stage, the mixture should look thick, dark, and glossy. The sourdough discard should blend into the chocolate without leaving noticeable lumps. Combining these ingredients thoroughly at this stage helps distribute the moisture and flavor throughout the brownies before the dry ingredients are added.
Folding in Cocoa Powder, Flour, and Salt
Add the unsweetened cocoa powder, all-purpose flour, and salt to the chocolate mixture. Sifting the dry ingredients is helpful because cocoa powder can develop small lumps during storage, and these lumps may be difficult to break up once the batter becomes thick. Use a flexible spatula to fold the ingredients into the wet mixture, scraping along the sides and bottom of the bowl as you work. Stop as soon as the dry streaks disappear. Overmixing can encourage excess gluten development in the flour, which may make the brownies tougher and less tender. If you are using optional chocolate chips or chunks, fold them in gently at this point. The batter should be thick enough to spread but not as stiff as cookie dough. There is no need to add extra flour to make it firmer, because the consistency is designed to account for the moisture in the sourdough discard.
Baking Sourdough Discard Brownies to Fudgy Perfection
Transfer the brownie batter into the prepared pan and spread it evenly into the corners. Smooth the surface with a spatula so the brownies bake at a consistent thickness. Place the pan in the preheated oven and bake for approximately 30–35 minutes. Because ovens, pans, and ingredient temperatures vary, begin checking the brownies around the 28-minute mark. The edges should look set, the top should appear delicate and crackly, and the center should no longer look liquid. Insert a toothpick into the center to check the texture. It should come out with moist crumbs attached rather than a stream of raw batter. A completely clean toothpick may indicate that the brownies have baked longer than necessary for a fudgy result. Remember that residual heat continues to affect the brownies after they leave the oven. Removing them at the right moment is one of the most important steps for achieving a soft, dense chocolate center.
Cooling and Cutting Clean Brownie Squares
Cooling is essential when making brownies with a rich chocolate and butter base. Although it may be tempting to cut into the pan immediately, freshly baked brownies are delicate and can fall apart while warm. Let them cool completely in the pan, ideally for one to two hours. During this time, the chocolate and butter gradually firm up, allowing the center to develop its final fudgy consistency. Once cooled, use the parchment overhang to lift the brownies onto a cutting board. Slice them into 16 squares using a sharp knife. For clean edges, wipe the blade between cuts, especially if the chocolate sticks to the knife. If you prefer particularly neat portions, you can briefly chill the cooled brownies before slicing them. However, allow refrigerated brownies to return to room temperature if you want a softer texture when serving. Proper cooling makes a significant difference in appearance, texture, and ease of serving.
Practical Ways to Keep Brownies Moist and Fudgy
The key to moist sourdough discard brownies is controlling the balance between ingredients and baking time. Avoid overbaking, since the center continues to set as the brownies cool. Measuring flour by weight is a reliable way to prevent adding too much, which is a common reason brownies become dry or cakey. Room-temperature eggs can help create a smoother batter, while finely chopped chocolate melts more evenly with the butter. Use the recommended 8-inch square pan to maintain the intended thickness, and remember that changing the pan size may affect the baking time and final texture. Once the flour is added, fold gently rather than beating the batter vigorously. Finally, allow the brownies to cool before judging their texture. A warm brownie may appear softer and more fragile than it will after resting. Following these simple techniques helps you achieve brownies with rich flavor, tender edges, and a dense, moist center.
Delicious Variations for Homemade Sourdough Brownies
This recipe provides a rich chocolate base that works well with a few optional additions. For walnut brownies, fold ½ cup of chopped toasted walnuts into the batter before baking. Their nutty flavor and crisp texture contrast nicely with the soft chocolate center. For sea salt brownies, sprinkle a small pinch of flaky sea salt over the surface just before placing the pan in the oven. The salt enhances the chocolate flavor and adds a pleasant contrast to the sweetness. Peanut butter lovers can swirl two to three tablespoons of slightly warmed peanut butter over the batter using the tip of a knife. Work gently so the peanut butter creates visible ribbons rather than blending completely into the chocolate. You can also serve the finished brownies as a brownie sundae by pairing a square with vanilla ice cream and a drizzle of chocolate sauce. These variations make it easy to adapt the dessert to different occasions and preferences.
How to Store Sourdough Discard Brownies
Once the brownies have cooled completely, store them in an airtight container to help preserve their moisture and chocolate flavor. At room temperature, they can generally be kept for up to three days. Choose a cool, dry place away from direct sunlight or sources of heat. If you prefer a firmer, denser texture, refrigerate the brownies in a sealed container for up to one week. Refrigeration causes the butter and chocolate to firm up, creating a texture that can resemble chocolate truffles. For a softer bite, allow refrigerated portions to sit at room temperature before serving. Avoid storing the brownies uncovered, because exposure to air can gradually dry the edges and reduce their pleasant fudgy consistency. If you are serving them to guests, you can cut the brownies shortly before serving for the freshest appearance. Proper storage makes it easier to enjoy the batch over several days without sacrificing too much texture or flavor.
Freezing Brownies and Preparing Them Ahead of Time
Sourdough discard brownies are convenient for advance preparation because their rich texture holds up well in the freezer. To freeze them, allow the baked brownies to cool completely and cut them into individual squares. Wrap each piece tightly, then place the wrapped portions in an airtight freezer-safe container. For the best quality, use them within three months. When you want a serving, remove a square and allow it to thaw at room temperature. You can also warm it briefly in the microwave if you prefer a softer, freshly warmed dessert. Keep heating time short to avoid drying out the edges or making the chocolate excessively hot. These brownies can also be baked a day before serving. Resting overnight allows the texture to settle and may make the chocolate flavor seem more pronounced. Preparing them ahead is especially useful when planning a gathering, packing desserts, or making treats for a busy week.
Common Mistakes to Avoid When Baking Brownies
Several small mistakes can affect the final result, but most are easy to prevent. One of the most common is overbaking, which can turn a fudgy brownie into a dry or crumbly dessert. Start checking the center before the end of the suggested baking window, and remember that moist crumbs on a toothpick are desirable. Another issue is measuring flour inaccurately. Scooping directly from a packed bag can add more flour than intended, so weighing the flour is preferable. Adding chocolate while it is still very hot can also interfere with the eggs, so allow the melted mixture to cool briefly. Using sourdough discard with a very different hydration level may affect the batter consistency, making standard 100% hydration discard the best choice. Finally, avoid slicing the brownies before they cool. The chocolate and butter need time to set, and patience will reward you with neater squares and a better fudgy texture.
Frequently Asked Questions About Sourdough Discard Brownies
Can I Use Sourdough Discard Straight from the Refrigerator?
Yes, refrigerated sourdough discard can be used in this recipe. Stir it well before measuring to distribute its moisture and flour evenly. If time allows, letting it sit briefly at room temperature can make it easier to mix into the chocolate batter. Cold discard may cool the batter slightly, but it does not need to be activated or fed before use. The most important consideration is that it has the intended consistency, preferably from a 100% hydration starter. If your discard is unusually thick or thin, the final texture may vary slightly. There is no need to warm it for an extended period, and it should not be left out unnecessarily.
Do Sourdough Discard Brownies Taste Sour?
These brownies generally taste rich and chocolatey rather than strongly sour. The combination of chocolate, cocoa powder, sugar, butter, and vanilla balances the natural acidity of the sourdough discard. Depending on the age and acidity of your discard, you may notice a slight tang in the finished dessert. Some bakers enjoy this contrast because it keeps the sweetness from tasting one-dimensional. If your discard has developed a particularly strong acidic aroma, the flavor may be more noticeable. For a balanced chocolate taste, use discard that is suitable for baking and choose semi-sweet or dark chocolate according to your preference. The finished brownies should still taste like a chocolate dessert, with the sourdough contributing a subtle background note rather than dominating the flavor.
Can I Use Active Sourdough Starter Instead of Discard?
Yes, active sourdough starter can be used if it has the same approximate hydration as the discard specified in the recipe. Because these brownies rely on eggs and their baking structure rather than sourdough fermentation, an active starter is not necessary. Unfed discard is often convenient because it allows you to use leftover starter during regular feeding. Regardless of which type you choose, aim for a standard 100% hydration starter so the flour and water balance remains similar. You do not need to leave the brownie batter to rise, and there is no proofing stage. Once the ingredients are mixed, spread the batter in the prepared pan and bake according to the recipe instructions.
Why Are My Sourdough Brownies Not Fudgy?
Brownies that turn out dry or cake-like may have been baked too long or contain too much flour. To improve the texture, measure flour carefully, ideally using a kitchen scale, and begin checking for doneness a few minutes before the expected baking time ends. The center should be set but still moist, and a toothpick should have crumbs attached rather than come out completely dry. Cooling also matters because the brownies continue to firm up after baking. If the batter is unusually thick or the discard has a different hydration level from the one specified, the texture may change. Following the ingredient measurements, using the recommended pan size, and avoiding excessive mixing can help produce a denser, more satisfying brownie.
How Can I Tell When the Brownies Are Fully Baked?
Look for edges that appear set, a surface that has developed a delicate crackle, and a center that is no longer liquid. A toothpick inserted into the middle should come out with moist crumbs, not wet batter. Avoid waiting until the toothpick is perfectly clean if you want a fudgy center, because the brownies will continue to set as they cool. Begin checking around 28 minutes, then use the appearance and texture to determine whether additional baking is needed. Baking time can vary according to your oven, pan material, and the exact temperature of your ingredients. Allowing the brownies to cool fully before cutting is the final step in achieving the intended texture.
Notes for the Best Results
For consistent results, use 100% hydration sourdough discard, measure the flour accurately, and choose good-quality chocolate. Dutch-process cocoa provides a mellow chocolate flavor, while natural cocoa creates a sharper profile. Chocolate containing approximately 50–70% cocoa is a useful middle ground for balancing sweetness and richness. A metal 8-inch square pan is a practical choice for even baking, although the precise baking time may vary by pan. If adding nuts, flaky sea salt, or peanut butter, keep the additions moderate so they complement rather than overwhelm the brownie base. Cool the brownies fully before slicing and store leftovers in an airtight container. If you are making them ahead, overnight resting is a convenient option, and individual portions can be frozen for longer storage.
Serving Ideas for Rich Chocolate Brownies
These fudgy sourdough brownies are satisfying on their own, but simple serving additions can make them suitable for a variety of occasions. Serve them at room temperature for a dense, chewy texture, or warm a square slightly and add a scoop of vanilla ice cream for a classic brownie sundae. A light sprinkle of flaky sea salt can enhance the chocolate flavor, while fresh berries provide a bright contrast to the richness. For a dessert platter, cut the brownies into smaller squares and serve them alongside cookies or fresh fruit. They are also a practical choice for potlucks, casual gatherings, lunchbox treats, and homemade gifts. If serving a larger group, prepare the brownies the day before and slice them once completely cool. Their rich flavor and convenient square portions make them easy to share without needing frosting or elaborate decoration.
Sourdough discard fudgy brownies offer a practical way to use leftover starter while making a deeply chocolatey homemade dessert. The combination of melted chocolate, cocoa powder, butter, and two types of sugar creates a rich base, while the sourdough discard contributes moisture and a subtle tang. Careful mixing, accurate measurements, and attention to baking time help deliver the contrast that makes a good brownie so appealing: a delicate crackly top, set edges, and a soft, fudgy center. Once you understand the importance of not overbaking and allowing the brownies to cool, the process becomes straightforward enough for everyday baking. Enjoy them plain, add your favorite optional toppings, or serve them with ice cream for a simple dessert. This recipe is a useful addition to any collection of sourdough discard recipes, especially when you want something chocolatey, easy to share, and satisfying to make.
Sourdough Discard Fudgy Brownies
Description: These sourdough discard brownies feature a rich chocolate flavor, a delicate crackly top, and a dense, fudgy center. Made with melted chocolate, cocoa powder, and sourdough discard, they are an easy homemade dessert that turns leftover starter into a delicious treat.
Preparation & Cooking Duration
- Preparation time: 15 minutes
- Cooking time: 30–35 minutes
- Cooling time: 1–2 hours
- Total time: Approximately 1 hour 45 minutes to 2 hours
- Yield: 16 brownies
Ingredients
- ½ cup (113 g) unsalted butter
- 4 oz (113 g) semi-sweet or dark chocolate, finely chopped
- ¾ cup (150 g) granulated sugar
- ¼ cup (50 g) light brown sugar, packed
- 2 large eggs, at room temperature
- 1 teaspoon vanilla extract
- ½ cup (120 g) sourdough discard, stirred before measuring
- ½ cup (50 g) unsweetened cocoa powder
- ½ cup (65 g) all-purpose flour
- ¼ teaspoon salt
- ½ cup (85 g) chocolate chips or chunks, optional
Step-by-Step Instructions
1. Prepare the oven and pan. Preheat the oven to 350°F (175°C). Line an 8-inch square baking pan with parchment paper, leaving an overhang on two sides for easy removal. Lightly grease the parchment if necessary.
2. Melt the butter and chocolate. Combine the butter and finely chopped chocolate in a heatproof bowl. Microwave in 20-second intervals, stirring between each, or melt over gently simmering water. Stir until smooth and allow to cool for a few minutes.
3. Whisk the eggs and sugars. In a large mixing bowl, whisk the granulated sugar, brown sugar, and eggs for 2–3 minutes until slightly thickened and glossy. Add the vanilla extract and whisk to combine.
4. Mix in the chocolate and discard. Gradually whisk the cooled chocolate mixture into the egg mixture. Add the sourdough discard and stir until the batter is smooth and evenly combined.
5. Add the dry ingredients. Sift in the cocoa powder, flour, and salt. Fold gently with a spatula until no dry streaks remain. Fold in the optional chocolate chips or chunks, if using. Avoid overmixing.
6. Bake the brownies. Spread the batter evenly in the prepared pan and smooth the top. Bake for 30–35 minutes, beginning to check around 28 minutes. The edges should be set, and a toothpick inserted into the center should come out with moist crumbs rather than raw batter.
7. Cool and slice. Let the brownies cool completely in the pan for 1–2 hours. Lift them out using the parchment overhang and cut into 16 squares with a sharp knife, wiping the blade between cuts for neat edges.
Nutritional Information
The following values are estimates per brownie, assuming the recipe makes 16 servings and the optional chocolate chips or chunks are included. Actual nutrition will vary depending on the chocolate and other brands used.
- Calories: Approximately 190–220 kcal
- Carbohydrates: Approximately 25–29 g
- Protein: Approximately 2–4 g
- Total fat: Approximately 9–12 g
- Saturated fat: Approximately 5–7 g
- Sugar: Approximately 17–21 g
- Fiber: Approximately 2–3 g
- Sodium: Approximately 40–80 mg
Notes
- Use 100% hydration sourdough discard for the intended consistency. An unusually thick or thin discard may affect the final texture.
- Dutch-process cocoa powder produces a smoother, mellow chocolate flavor, while natural cocoa powder offers a slightly sharper taste.
- Chocolate containing approximately 50–70% cocoa provides a balanced result.
- Avoid overbaking, as the brownies continue to set while cooling.
- Weigh the flour for the most accurate measurement and fudgiest texture.
- Room-temperature eggs combine more evenly with the chocolate mixture.
- A metal baking pan generally produces more even edges than a thick glass dish.
- Store cooled brownies in an airtight container at room temperature for up to 3 days or refrigerate for up to 1 week.
- For longer storage, wrap individual brownies tightly and freeze in an airtight container for up to 3 months for the best quality.
- To make ahead, bake the brownies a day before serving. Resting overnight may help the chocolate flavor become more pronounced.
Optional Variations
- Walnut brownies: Fold ½ cup chopped toasted walnuts into the batter.
- Sea salt brownies: Sprinkle a small pinch of flaky sea salt over the batter before baking.
- Peanut butter swirl brownies: Swirl 2–3 tablespoons of slightly warmed peanut butter across the batter.
- Brownie sundae: Serve a slightly warmed brownie with vanilla ice cream and chocolate sauce.