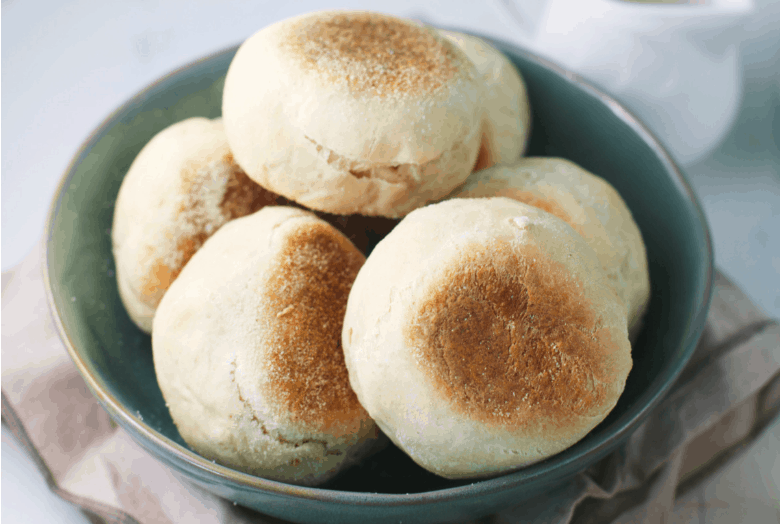
There is something truly special about a freshly toasted English muffin. With its golden crust, tender interior, and signature pockets that perfectly hold melted butter, jam, honey, or your favorite breakfast toppings, this classic breakfast bread has remained a favorite for generations. While many people buy English muffins from the grocery store, making them from scratch at home creates a completely different experience. The flavor is richer, the texture is softer, and the aroma that fills your kitchen while they cook is simply irresistible.
These homemade English muffins are soft, chewy, and packed with the famous nooks and crannies that make them so beloved. Unlike traditional oven-baked bread, English muffins are cooked on a skillet or griddle, giving them their distinctive appearance and texture. They are versatile enough to enjoy as part of a simple breakfast, transformed into breakfast sandwiches, or used as the foundation for classic Eggs Benedict.
One of the best things about this recipe is that it uses simple pantry staples that are commonly found in most kitchens. Flour, milk, yeast, butter, sugar, and an egg come together to create a dough that transforms into bakery-style muffins with very little effort. Whether you are an experienced baker or someone making yeast bread for the first time, this recipe is approachable and rewarding.
Why Homemade English Muffins Are Worth Making
Store-bought English muffins are convenient, but homemade versions offer several advantages. First, you have complete control over the ingredients. There are no unnecessary preservatives or additives, and you can customize the recipe according to your preferences.
Second, homemade muffins have a superior texture. They are soft and airy inside while maintaining a lightly crisp exterior when toasted. The flavor is also deeper and more satisfying because fresh ingredients are used.
Another major advantage is freshness. Few things compare to enjoying a warm English muffin straight from the skillet. The aroma of freshly cooked bread and melted butter creates a breakfast experience that feels both comforting and luxurious.
The Secret Behind Those Famous Nooks and Crannies
One of the defining characteristics of English muffins is the abundance of small air pockets inside. These pockets are what make them perfect for holding butter, honey, jam, or peanut butter.
Several factors contribute to creating these classic nooks and crannies. The dough contains enough moisture to remain soft and pliable, while the yeast fermentation process develops air bubbles throughout the dough. The addition of melted butter also contributes to the tender texture.
Unlike sandwich bread, English muffins are not baked immediately after shaping. They undergo a second rise that helps create additional air pockets before cooking. This step is crucial for achieving the light, airy interior that makes English muffins unique.
Understanding the Ingredients
Every ingredient in this recipe serves a specific purpose.
All-purpose flour creates the structure of the muffins. It provides enough protein for chewiness while still allowing the interior to remain soft.
Warm milk adds richness and moisture. It helps create a tender crumb and enhances flavor.
Water balances the hydration level of the dough and ensures the yeast activates properly.
Granulated sugar not only adds a touch of sweetness but also helps feed the yeast, encouraging fermentation.
Active dry yeast is responsible for making the dough rise and creating the airy texture.
Salt enhances flavor and strengthens the dough structure.
Melted butter contributes richness, softness, and improved texture.
Egg adds tenderness and helps bind the dough together.
Cornmeal or semolina is sprinkled onto the baking sheets and skillet to prevent sticking and create the traditional texture on the exterior.
Why Yeast Activation Matters
Proper yeast activation is one of the most important steps in successful bread making. The milk and water should be warm but not hot. Temperatures around 110°F (43°C) are ideal because they activate the yeast without damaging it.
When yeast is combined with warm liquid and sugar, it begins feeding and producing gas. Within several minutes, the surface should become foamy. This indicates that the yeast is active and ready to use.
If the mixture does not foam, the yeast may be expired or the liquid temperature may have been incorrect. Starting with active yeast ensures the muffins rise properly and develop their characteristic texture.
Mixing the Dough for the Best Texture
The dough for English muffins is softer and stickier than many other bread doughs. This moisture level is essential because it helps create the soft interior and airy crumb.
Using a stand mixer simplifies the process significantly. The mixer kneads the dough until it becomes smooth, elastic, and slightly tacky. Proper kneading develops gluten, which provides strength and structure while trapping air produced during fermentation.
Although the dough can be mixed by hand, a stand mixer often delivers more consistent results and requires less effort.
The Importance of Proper Rising Time
Proofing is where much of the flavor development occurs. During this stage, yeast ferments the sugars in the dough, producing gas that causes expansion.
While one hour is generally sufficient for the dough to double in size, extending the proofing time can significantly improve flavor. Some bakers prefer allowing the dough to ferment for several hours or even overnight in the refrigerator.
Longer fermentation develops more complex flavors and improves the overall texture of the finished muffins.
Shaping Perfect English Muffins
Once the dough has risen, it is gently pressed onto a lightly floured surface. The goal is to preserve as much trapped air as possible while creating an even thickness.
Using a round cutter creates uniform muffins that cook evenly. However, if you do not have a cutter, the dough can be divided and shaped by hand.
Consistency in size helps ensure that all muffins finish cooking at the same time. Uniform thickness also contributes to even browning and a professional appearance.
Why the Second Rise Is Essential
After cutting, the dough rounds undergo a second proof. This additional resting period allows the gluten to relax and the dough to become light and puffy.
Skipping this step often results in dense muffins with fewer air pockets. The second rise gives the yeast additional time to create the airy structure that produces those famous nooks and crannies.
When properly proofed, the muffins should appear noticeably larger and slightly puffed before cooking.
Mastering the Skillet Cooking Method
Unlike traditional bread loaves, English muffins are cooked directly on a skillet or griddle. This method gives them their unique texture and appearance.
A cast-iron skillet is particularly effective because it distributes heat evenly. Moderate heat is important because cooking too quickly can brown the outside before the center cooks completely.
Covering the skillet during cooking helps trap heat and steam, allowing the interior to cook through while maintaining softness.
Patience is key during this stage. Low to medium heat produces the best results.
Knowing When to Flip
One of the most common mistakes when making English muffins is flipping them too early.
The tops should appear dry rather than wet or glossy. They should also hold their shape without collapsing when the lid is removed.
If flipped prematurely, the center may still be undercooked, causing the muffins to flatten and lose volume.
Testing one muffin before flipping the entire batch can help determine readiness. If it maintains its structure, the remaining muffins are likely ready as well.
Achieving the Perfect Golden Exterior
The ideal English muffin has a lightly browned exterior with a subtle crispness. This color develops gradually as the dough cooks.
Semolina or cornmeal adds texture while preventing sticking. Brushing away excess between batches prevents burning and ensures clean flavor.
Proper browning enhances both appearance and taste, creating the classic look associated with bakery-style English muffins.
Creative Serving Ideas
One reason English muffins remain popular is their incredible versatility.
For a traditional breakfast, simply toast and spread with butter and fruit preserves.
They are also excellent for breakfast sandwiches. Fill them with eggs, cheese, sausage, bacon, or turkey for a hearty morning meal.
English muffins can serve as a base for Eggs Benedict, one of the most iconic brunch dishes in the world.
For a lighter option, top them with avocado, smoked salmon, or fresh vegetables.
They can even be used for mini pizzas, open-faced sandwiches, or sweet snacks with nut butter and sliced fruit.
Storage and Freezing Tips
Freshly made English muffins stay soft for several days when stored in an airtight container.
For longer storage, freezing works exceptionally well. Allow the muffins to cool completely before placing them in freezer-safe bags.
Frozen muffins can be thawed at room temperature or toasted directly from frozen, making them a convenient make-ahead breakfast option.
Many bakers prepare large batches specifically for freezing because the texture remains excellent after reheating.
Common Mistakes to Avoid
Several common issues can affect the final result.
Using liquid that is too hot may kill the yeast.
Adding excessive flour can create dense, dry muffins.
Insufficient proofing often results in limited rise and fewer air pockets.
Cooking over high heat may burn the exterior while leaving the center undercooked.
Flipping too early can cause the muffins to collapse and lose volume.
Paying attention to these details helps ensure consistent success.
Why This Recipe Works
The balance of milk, water, butter, yeast, and flour creates a dough that is both sturdy and soft. The double-rise method develops flavor and structure, while skillet cooking produces the classic texture that English muffin lovers expect.
The result is a homemade breakfast bread that rivals any bakery version. Soft, chewy, and filled with beautiful nooks and crannies, these English muffins provide the perfect foundation for countless breakfast creations.
Whether enjoyed with butter and jam, transformed into sandwiches, or served alongside brunch favorites, these homemade English muffins deliver bakery-quality flavor with simple ingredients and straightforward techniques. Once you experience their fresh taste and fluffy texture, they may become a permanent addition to your breakfast routine.
Simple English Muffins Recipe
Prep Time: 20 minutes
Cook Time: 25 minutes
Rise Time: 1 hour 30 minutes
Total Time: 2 hours 15 minutes
Yield: 14 English Muffins
Cuisine: American Breakfast
Equipment
- Stand mixer
- Large mixing bowl
- Large skillet or griddle
- 2½-inch round cutter
- Baking sheets
Ingredients
- ¾ cup milk (180 ml)
- ½ cup water (120 ml)
- 2 tablespoons granulated sugar
- 1 packet (7 g) active dry yeast
- 3 cups all-purpose flour (360 g)
- 1 teaspoon salt
- 3 tablespoons butter, melted and slightly cooled (42 g)
- 1 large egg, room temperature
- Cornmeal or semolina, for dusting
Instructions
Step 1: Activate the Yeast
Combine milk, water, and sugar in a bowl. Warm to about 110°F (43°C). Stir in yeast and let stand for 5–7 minutes until foamy.
Step 2: Prepare the Dough
In a stand mixer bowl, combine flour and salt. Add the yeast mixture, melted butter, and egg. Mix until a smooth, elastic dough forms, about 7 minutes.
Step 3: First Rise
Transfer dough to a lightly oiled bowl. Cover and let rise in a warm place until doubled in size, about 1 hour.
Step 4: Shape the Muffins
Place dough onto a floured surface and gently flatten to just under 1 inch thick. Cut rounds using a 2½-inch cutter.
Step 5: Second Rise
Arrange on parchment-lined baking sheets dusted with cornmeal or semolina. Cover loosely and let rise for 30 minutes until puffy.
Step 6: Cook the Muffins
Heat a skillet over medium heat. Sprinkle with cornmeal or semolina. Place 3–4 muffins into the skillet, cover, and cook over medium-low heat for 6–8 minutes until golden underneath and dry on top.
Step 7: Flip and Finish
Turn each muffin carefully and cook another 6–8 minutes until both sides are golden brown and the center is fully cooked.
Step 8: Cool and Serve
Transfer to a wire rack and cool slightly. Split with a serrated knife and toast before serving.
Helpful Tips
- Refrigerate dough overnight for deeper flavor.
- Use a cast-iron skillet for even cooking.
- Adjust heat between batches to prevent over-browning.
- Toast before serving for the best texture.
Nutrition (Per Muffin – Approximate)
- Calories: 139 kcal
- Carbohydrates: 23 g
- Protein: 4 g
- Fat: 3 g
- Saturated Fat: 2 g
- Fiber: 1 g
- Sugar: 2 g
- Sodium: 196 mg