Sourdough Discard Garlic Pull Apart Bread is one of the most comforting homemade bread recipes you can bake in your kitchen. This fluffy and buttery bread combines soft layers of dough with rich garlic butter and fresh herbs, creating a loaf that is both flavorful and visually impressive. Every piece pulls apart easily, making it perfect for sharing during family dinners, holiday meals, game nights, or weekend gatherings. What makes this recipe even more appealing is the use of sourdough discard, which adds subtle depth of flavor while helping reduce kitchen waste in a delicious way.
Unlike traditional garlic bread recipes that rely on sliced loaves, this pull apart bread is made from individual pieces of dough layered together in a loaf pan. As the bread bakes, the buttery garlic filling melts into every layer, producing soft, tender bread with crispy golden edges. The aroma alone is enough to fill the kitchen with warmth and anticipation. Whether served alongside pasta, soup, salad, or grilled dishes, this savory bread recipe easily becomes the highlight of the table.
Why Sourdough Discard Makes This Bread Better
Sourdough discard is often overlooked, but it can completely transform homemade baked goods. In this garlic pull apart bread recipe, the discard contributes a light tangy flavor that balances the richness of butter and garlic beautifully. Instead of overpowering the bread, the sourdough adds subtle complexity that makes the final loaf taste more developed and bakery-style.
The natural fermentation qualities of sourdough discard also help improve texture. The dough becomes softer, more tender, and slightly chewy in the best possible way. Even though instant yeast is used to help the bread rise efficiently, the sourdough discard still plays an important role in flavor and moisture retention. This means the bread stays fresher for longer while maintaining its pillowy texture.
Another major advantage of using sourdough discard is reducing food waste. Many home bakers regularly feed their sourdough starter and search for practical ways to use the leftover discard instead of throwing it away. Recipes like this allow you to turn extra starter into something incredibly satisfying while maximizing ingredients already available in your kitchen.
The Flavor Combination That Makes This Bread Irresistible
Garlic bread has always been a favorite comfort food, but this version delivers even more flavor because every layer is coated in seasoned garlic butter. The combination of melted butter, garlic powder, parsley or rosemary, and flaky sea salt creates bold savory flavor throughout the loaf. Instead of garlic flavor sitting only on the surface, it is infused into each pull-apart section.
Fresh herbs make a noticeable difference in this recipe. Parsley gives the bread a classic fresh garlic bread taste, while rosemary creates a slightly earthy and aromatic flavor profile. Both options work beautifully and complement the buttery dough perfectly. The flaky sea salt sprinkled on top after baking enhances every bite and adds a subtle crunch that balances the soft texture inside.
The bread itself remains rich yet light. Each layer bakes into soft folds that separate easily when pulled apart. The edges become lightly crisp and golden while the center stays fluffy and tender. This balance of textures is one of the reasons pull apart bread recipes continue to grow in popularity among home bakers.
Understanding the Dough for Perfect Texture
Creating soft homemade bread begins with understanding dough texture. This sourdough discard bread dough should feel smooth, soft, and slightly tacky without becoming sticky. The correct balance of flour, milk, butter, and sourdough discard is what creates the tender structure that makes this bread so enjoyable.
Warmed milk is essential because it activates the instant yeast properly. A temperature around 110°F helps the yeast begin working without overheating or damaging it. Combined with sugar, the yeast creates the rise needed for fluffy bread layers. The egg contributes richness and softness, while butter adds moisture and flavor.
During kneading, the dough gradually becomes elastic and smooth. Kneading helps develop gluten, which gives the bread structure while still allowing softness. Whether using a stand mixer or kneading by hand, the dough should eventually become stretchy and easy to shape.
The sourdough discard contributes extra hydration, so dough consistency may vary slightly depending on the thickness of your starter. Small adjustments with flour or milk can help achieve the ideal texture. Paying attention to the dough rather than strictly following measurements ensures the best homemade bread results.
Why Pull Apart Bread Is Perfect for Sharing
One reason pull apart bread recipes are so popular is the interactive and shareable experience they create. Instead of slicing traditional bread, everyone can simply pull away soft buttery sections directly from the loaf. This makes the bread feel casual, cozy, and inviting at the dining table.
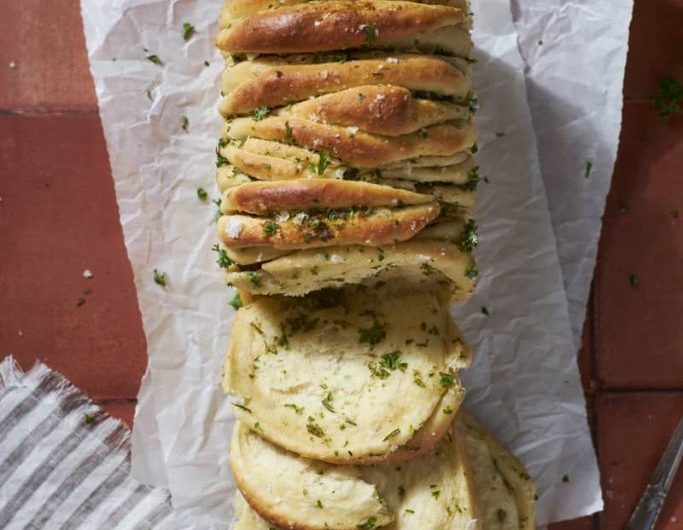
The layered presentation also makes the loaf visually impressive. Once baked, the golden folds rise beautifully in the pan, creating texture and dimension that look professionally baked. The buttery herb coating caramelizes slightly during baking, giving the loaf a rich golden finish that feels bakery-quality.
This bread works especially well for entertaining because it can accompany many different meals. It pairs wonderfully with pasta dishes, roasted vegetables, soups, grilled meats, or creamy casseroles. It can also be served as an appetizer with dipping sauces or enjoyed as a snack on its own.
Because each piece already contains flavorful garlic butter, there is no need for additional spreads. Every bite is seasoned, soft, and satisfying from the inside out. Guests often find themselves reaching for extra pieces because the pull-apart texture makes the bread incredibly addictive.
Step-by-Step Bread Making Process Explained
Making homemade pull apart bread may look complicated, but the process is actually simple and beginner-friendly. The first step involves combining warmed milk, yeast, and sugar to activate the yeast. Once the dry ingredients and sourdough discard are added, the dough begins forming into a shaggy mixture that eventually becomes smooth through kneading.
After kneading, the dough needs time to rise until doubled in size. This first rise develops flavor while creating lightness in the bread. Placing the dough in a lightly greased bowl and covering it helps prevent drying while allowing proper expansion.
While the dough rises, the garlic butter topping can be prepared. Softened butter mixed with herbs, garlic powder, and salt creates a spreadable filling that coats each layer of dough evenly. This step is where much of the flavor develops, so spreading the filling generously helps maximize taste.
Once risen, the dough is divided into equal portions. Flattening each piece into circles before spreading the butter mixture ensures every layer contains garlic flavor. Folding the dough pieces and arranging them vertically inside the loaf pan creates the signature pull apart structure.
The second rise is shorter but equally important. It allows the dough pieces to puff slightly before baking, resulting in soft airy layers. Baking transforms the loaf into golden buttery bread with crispy edges and tender centers.
Tips for Achieving Bakery-Style Garlic Pull Apart Bread
Several simple techniques can help improve the quality of homemade pull apart bread significantly. First, accurate measuring is important for dough consistency. Using a kitchen scale provides better precision, especially when dividing the dough into equal portions for even baking.
Do not rush the rise times. Allowing the dough to fully rise creates softer bread with better texture. Under-proofed dough may bake into dense bread instead of fluffy layers. Warm kitchen temperatures usually help the dough rise more efficiently.
Softened butter works best for the filling because it spreads easily across the dough without tearing it. If the butter is too melted, it may leak excessively during shaping. Properly softened butter coats each dough piece evenly and creates better flavor distribution.
Avoid adding too much extra flour during kneading. Slightly tacky dough often produces softer bread after baking. Excess flour can make the loaf dry and heavy. If the dough sticks excessively, small flour adjustments work better than large additions.
Finally, brushing leftover garlic butter on the warm loaf after baking intensifies flavor and gives the bread a glossy finish. Adding flaky sea salt immediately afterward creates the perfect final touch.
Serving Ideas for Garlic Pull Apart Bread
This homemade garlic bread recipe pairs beautifully with countless meals and occasions. It is especially delicious alongside classic Italian dishes like spaghetti, lasagna, creamy Alfredo pasta, or baked ziti. The buttery garlic flavor complements tomato-based sauces and cheesy dishes perfectly.
Soups and stews also pair wonderfully with pull apart bread. Tomato soup, creamy potato soup, chicken soup, or beef stew become even more comforting when served with warm homemade bread on the side. The soft layers are ideal for soaking up flavorful broth and sauces.
For gatherings and parties, this bread works well as an appetizer or snack. Guests can easily pull apart pieces while socializing, making it convenient for casual entertaining. Serving the bread with marinara sauce, garlic dip, or herbed olive oil adds even more flavor variety.
The bread can also be enjoyed for brunch or breakfast alongside eggs and savory dishes. Since the loaf reheats well, leftovers remain delicious the next day when warmed slightly in the oven.
Storage and Reheating Instructions
Homemade pull apart bread is best enjoyed fresh and warm, but proper storage helps maintain its softness for later enjoyment. Once cooled completely, store the bread in an airtight container or tightly wrapped at room temperature for up to three days.
To reheat, place the bread in a warm oven for several minutes until heated through. This refreshes the buttery texture and restores the soft interior. Covering the loaf loosely with foil while reheating helps prevent excessive browning.
The bread can also be frozen for longer storage. Wrap the cooled loaf tightly in plastic wrap and place it inside a freezer-safe bag or container. When ready to serve, thaw at room temperature and warm in the oven before eating.
Individual pull apart sections can also be frozen separately for convenient reheating. This works especially well for quick snacks or side dishes during busy weekdays.
Notes for Best Homemade Bread Results
Using room-temperature sourdough discard helps the dough mix more evenly and rise properly. Cold discard may slow fermentation and affect dough consistency slightly.
Both parsley and rosemary work beautifully in this recipe. Parsley creates classic garlic bread flavor, while rosemary offers a more aromatic and rustic taste.
This recipe can easily be prepared without a stand mixer. Mixing by hand with a wooden spoon followed by kneading on a clean surface works just as well.
Dividing the dough evenly helps ensure consistent baking. Using a kitchen scale makes shaping easier and improves the appearance of the finished loaf.
Do not overbake the bread. The loaf should appear golden brown while remaining soft in the center. Overbaking may dry out the layers.
Adding flaky sea salt after baking enhances flavor and creates a bakery-style finish that complements the buttery garlic topping perfectly.
Why This Bread Recipe Belongs in Your Baking Routine
Homemade Sourdough Discard Garlic Pull Apart Bread combines everything people love about comfort food: buttery texture, bold garlic flavor, soft homemade dough, and warm pull-apart layers. It transforms simple pantry ingredients into a bakery-worthy loaf that feels both impressive and approachable.
For sourdough bakers, this recipe offers a practical and delicious use for discard while creating something completely different from traditional bread loaves. The subtle tang from the discard balances the richness beautifully and makes the bread taste more flavorful and developed.
This recipe is also versatile enough for everyday dinners, holidays, entertaining, or casual family meals. Its shareable pull apart design makes it interactive and fun while remaining deeply satisfying. Once you experience the aroma of freshly baked garlic pull apart bread filling the kitchen, it quickly becomes a recipe worth making again and again.
Part 2: Structured Recipe Card
Sourdough Discard Garlic Pull Apart Bread
Description
Soft, buttery, and loaded with savory garlic herb flavor, this Sourdough Discard Garlic Pull Apart Bread is a comforting homemade bread recipe perfect for sharing. Made with fluffy layers of dough, seasoned garlic butter, and sourdough discard, this loaf delivers bakery-style texture and rich flavor in every bite.
Preparation & Cooking Duration
Prep Time: 25 minutes
Cook Time: 30 minutes
Rise Time: 2 hours 15 minutes
Total Time: 3 hours 10 minutes
Servings
6 servings
Equipment
- Kitchen scale
- 9×5-inch loaf pan
Ingredients
For the Bread
- ¼ cup warmed dairy or non-dairy milk (110℉)
- 1½ teaspoons instant yeast
- 2 teaspoons granulated sugar
- 2 cups all-purpose flour
- 200 grams sourdough discard (unfed and room temperature)
- 1 lightly beaten egg
- 1 tablespoon chopped fresh parsley or rosemary
- 1 teaspoon kosher salt
- 1 teaspoon garlic powder
- 2 tablespoons melted unsalted butter
For the Garlic Butter Topping
- 6 tablespoons softened unsalted butter
- 1 tablespoon chopped fresh parsley or rosemary
- 1 tablespoon garlic powder
- ½ teaspoon kosher salt
- Flaky sea salt for garnish
Step-by-Step Instructions
- In the bowl of a stand mixer, combine the warm milk, instant yeast, and granulated sugar.
- Add the flour, sourdough discard, beaten egg, chopped herbs, kosher salt, and garlic powder.
- With the mixer on low speed, slowly pour in the melted butter. Increase speed to medium and mix until a shaggy dough forms.
- Transfer the dough to a clean surface and knead for about 3–4 minutes until smooth and slightly tacky.
- Place the dough in a greased bowl and cover with plastic wrap. Let rise for 60–90 minutes or until doubled in size.
- Prepare the topping by mixing softened butter, chopped herbs, garlic powder, and salt in a small bowl until combined.
- Grease a 9×5-inch loaf pan.
- Turn the risen dough onto a work surface and divide into 12 equal pieces.
- Flatten each dough piece into a rough 4-inch circle. Spread generously with the garlic butter mixture.
- Fold each piece in half and place fold-side down into the prepared loaf pan.
- Repeat with remaining dough pieces, using almost all of the butter mixture while reserving a small amount for finishing.
- Cover the pan and let the dough rise again for 30–45 minutes until puffed slightly.
- Preheat the oven to 350℉.
- Bake for 25–30 minutes until the loaf becomes golden brown.
- Brush the warm bread with the remaining garlic butter mixture and sprinkle with flaky sea salt.
- Allow the bread to cool in the pan for about 10 minutes before serving warm.
Nutritional Information
Nutritional values may vary depending on ingredient brands and serving sizes.
- Calories: Approx. 320 kcal
- Carbohydrates: 34g
- Protein: 7g
- Fat: 17g
- Saturated Fat: 10g
- Cholesterol: 55mg
- Sodium: 420mg
- Fiber: 2g
- Sugar: 3g