If you enjoy the rich, creamy taste of cheesecake but want something lighter, more convenient, and higher in protein, these High-Protein Cheesecake Jars are an excellent choice. This no-bake dessert combines smooth low-fat cream cheese, thick Greek yogurt, vanilla protein powder, and a touch of honey or maple syrup to create a filling that tastes indulgent without requiring a traditional cheesecake recipe. Instead of preparing a large cheesecake, everything is portioned into individual jars, making these treats simple to prepare, store, and serve. The combination of creamy cheesecake filling, buttery biscuit crumbs, and fresh fruit creates a satisfying contrast of textures in every spoonful. These jars can work as a healthy dessert, protein-rich snack, breakfast option, or convenient post-workout treat.
Why High-Protein Cheesecake Jars Are So Popular
High-protein cheesecake jars have become a practical choice for people who want a dessert that offers more nutritional value than a traditional slice of cheesecake. Classic cheesecake is usually rich in cream cheese, sugar, and butter, while this version uses Greek yogurt and protein powder to increase the protein content and create a satisfying texture. The individual portions also make serving easier because each jar provides a defined amount rather than requiring you to cut and measure a whole cake. Another advantage is convenience. There is no oven, water bath, complicated crust technique, or lengthy baking process involved. Once the crust and filling are prepared, the jars simply need time in the refrigerator to chill and firm. This makes them especially useful for busy mornings, meal preparation, gatherings, and everyday sweet cravings.
What Makes This Cheesecake Jar Recipe Different
The appeal of this cheesecake jar recipe comes from its balance of familiar cheesecake flavors and simple preparation. The crust uses crushed graham crackers or digestive biscuits combined with melted butter and honey or maple syrup, giving each jar a lightly sweet, buttery foundation. The filling brings together softened low-fat cream cheese, plain Greek yogurt, vanilla protein powder, honey or maple syrup, vanilla extract, and lemon juice. Greek yogurt adds tanginess and creaminess, while the protein powder contributes structure and a vanilla flavor that complements the other ingredients. Lemon juice is particularly useful because its acidity helps brighten the rich dairy ingredients and gives the filling a cheesecake-like character. Once chilled, the finished dessert becomes thick, creamy, and spoonable, creating a texture that feels much more indulgent than its simple ingredient list suggests.
The Role of the Biscuit Crust
A good cheesecake needs contrast, and the biscuit crust provides exactly that. The crushed graham crackers or digestive biscuits create a slightly crisp, crumbly base beneath the creamy filling, while melted butter binds the crumbs together. Honey or maple syrup adds sweetness and helps the crust develop a cohesive texture. The goal is not to create a thick, hard crust like a baked cheesecake. Instead, the crumbs should resemble wet sand after mixing, allowing them to hold together when gently pressed into the jars. About two tablespoons of the mixture go into the bottom of each jar, creating a modest layer that complements rather than overwhelms the filling. Refrigerating the crust before assembly gives the butter time to firm, helping the base remain distinct when the cheesecake mixture is added.
Choosing Between Graham Crackers and Digestive Biscuits
Either graham crackers or digestive biscuits can be used for the crust, depending on what is available and the flavor you prefer. Graham crackers tend to provide a familiar American cheesecake flavor with a light sweetness and crisp texture. Digestive biscuits offer a slightly deeper biscuit taste and can make the dessert feel especially rich. Because the recipe calls for crushed biscuits rather than whole pieces, they should be finely crumbled before measuring. Large pieces can make the crust uneven and difficult to press into the jars. A food processor can make quick work of crushing the biscuits, but placing them in a sealed bag and crushing them with a rolling pin also works. Whichever option you choose, aim for relatively even crumbs so the melted butter and sweetener distribute throughout the mixture.
Building the Creamy Protein Cheesecake Filling
The filling is the heart of this recipe, and achieving a smooth consistency begins with the cream cheese. Low-fat cream cheese should be softened before mixing because cold cream cheese can remain lumpy when combined with the other ingredients. Beating it first allows the texture to become smooth and creamy before the Greek yogurt and remaining ingredients are added. Plain Greek yogurt contributes a thick consistency and a pleasant tang, while vanilla protein powder increases the protein content and reinforces the dessert’s sweet vanilla flavor. Honey or maple syrup provides additional sweetness, and vanilla extract rounds out the taste. Finally, lemon juice adds brightness and helps recreate the distinctive tang associated with traditional cheesecake. The finished mixture should be thick enough to spoon or pipe into the jars without running.
Why Greek Yogurt Works So Well
Greek yogurt is one of the key ingredients that gives these jars their creamy texture while helping make the dessert more protein-focused. Its naturally thick consistency allows it to blend with softened cream cheese without producing a watery filling. Plain Greek yogurt also has a mild tang that works beautifully with vanilla, lemon, and sweeteners. Since the yogurt is plain, it does not introduce an additional fruit or artificial flavor that could compete with the cheesecake profile. For the best results, choose a thick Greek yogurt that you already enjoy eating. The quality and consistency of the yogurt can affect the final texture, so an especially thin yogurt may produce a softer filling. The combination of yogurt and cream cheese creates a balanced filling that is rich enough to taste like cheesecake while remaining fresh and creamy.
How Protein Powder Changes the Recipe
Vanilla protein powder serves more than one purpose in these cheesecake jars. Its most obvious role is increasing the protein content, but it also adds sweetness and vanilla flavor to the filling. Because protein powders differ considerably in sweetness, texture, and flavor, it is best to use one whose taste you already enjoy. A protein powder that tastes pleasant in a shake will generally work well in this dessert. The powder can also make the cheesecake mixture thicker, which is useful for a no-bake recipe. If the finished mixture becomes too thick to spoon comfortably, one to two tablespoons of milk can be added to loosen it. This small adjustment allows you to control the consistency without changing the basic character of the recipe.
Preparing the Crust Correctly
Begin the recipe by combining the crushed graham crackers or digestive biscuits with melted butter and honey or maple syrup in a medium bowl. Stir thoroughly until the crumbs are evenly coated and the mixture resembles wet sand. This visual cue is useful because it indicates that the butter and sweetener have been distributed throughout the crumbs. Divide the mixture between four medium jars, using approximately two tablespoons per jar. Press the crumbs gently with the back of a spoon to create an even layer. There is no need to pack the crust extremely firmly because a very compact layer can become difficult to scoop later. Once the jars have been filled with the crust mixture, place them in the refrigerator while you prepare the cheesecake filling.
Creating a Smooth Filling Without Lumps
To prepare the filling, place the softened low-fat cream cheese in a large mixing bowl and beat it until it becomes smooth. This first step is important because adding all the ingredients at once can make it harder to eliminate small lumps of cream cheese. Once the cream cheese is creamy, add the plain Greek yogurt, vanilla protein powder, honey or maple syrup, vanilla extract, and lemon juice. Mix everything until the ingredients are fully incorporated and the filling looks smooth and silky. Scrape the sides of the bowl as needed so that no dry protein powder or cream cheese remains hidden around the edges. The final consistency should be thick and creamy but still easy to spoon. If necessary, a small amount of milk can be added to adjust the texture.
How to Assemble the Cheesecake Jars
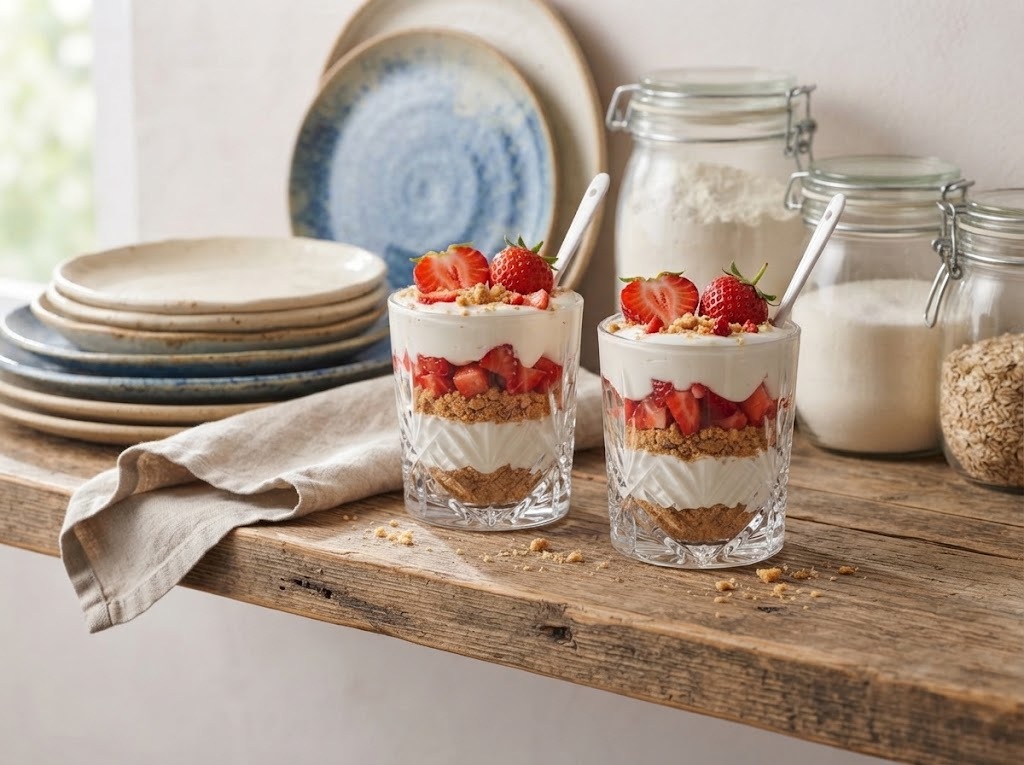
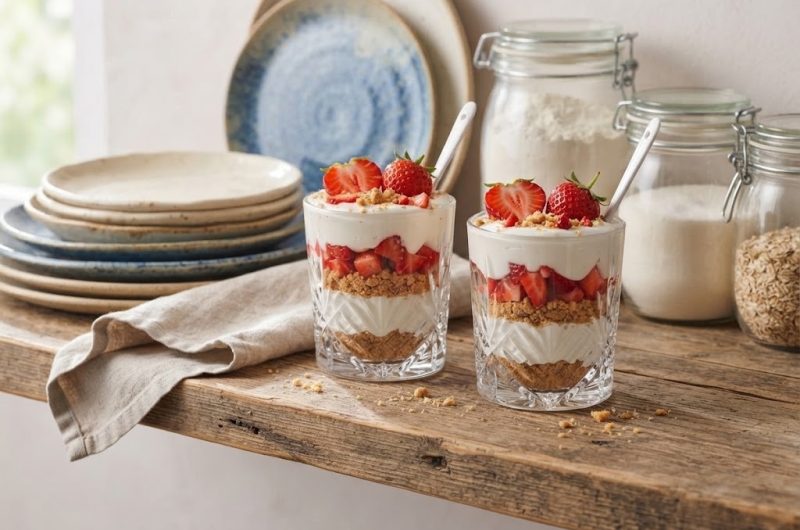
Once the crust has chilled and the filling is ready, the jars can be assembled. Spoon or pipe the cheesecake mixture over the biscuit base, dividing it evenly among the four jars. Using a piping bag can create especially neat layers, but an ordinary spoon works perfectly well for a casual presentation. Gently smooth the surface of the filling before adding toppings. If you enjoy layered desserts, you can create additional layers by alternating small amounts of crust, cheesecake filling, and fruit. However, the simple two-layer arrangement of biscuit crumbs followed by cheesecake filling is equally attractive. The clear sides of glass jars naturally showcase the layers, making these desserts suitable for parties, family gatherings, or meal-prep containers.
Choosing the Best Cheesecake Toppings
The topping options make this recipe particularly flexible. Fresh strawberries and blueberries add color, freshness, and natural fruit flavor, while crushed nuts contribute crunch. Chocolate chips can make the jars feel more indulgent, and caramel drizzle provides a rich finishing touch. Crushed cookies are another easy option when you want a dessert with more texture, while berry sauce brings additional fruit flavor and visual appeal. Whipped cream can be added when serving for a more traditional dessert presentation. You do not need to use every topping listed in the recipe. Choose one or two that complement the vanilla cheesecake base. Fresh berries are an especially good choice when you want the dessert to taste bright and refreshing rather than overly rich.
The Importance of Chilling
Although these are no-bake cheesecake jars, refrigeration is an important part of the preparation rather than an optional finishing step. After assembly, the jars should be refrigerated for at least two hours. This allows the filling to become firmer and gives the flavors time to settle together. The crust also becomes more cohesive as the butter chills. For an even thicker texture and more developed flavor, the jars can be refrigerated overnight. This makes the recipe particularly useful for meal prep because the dessert can be prepared in advance rather than immediately before serving. Keep the jars covered while they are refrigerated to protect them from absorbing odors from other foods and to keep the toppings and filling fresh.
Making the Recipe Ahead of Time
One of the biggest practical benefits of individual cheesecake jars is how easily they fit into a make-ahead routine. Since the jars need at least two hours to chill, preparing them several hours before serving is actually helpful. You can assemble the crust and filling, add your preferred toppings, cover the jars, and place them in the refrigerator until needed. This approach is useful when preparing desserts for a gathering because there is no last-minute baking or slicing involved. It is also convenient for people who like having prepared snacks available throughout the week. When stored correctly in the refrigerator, the cheesecake jars can be kept for up to four days. For the best presentation, toppings that are particularly delicate or crisp can be added shortly before serving.
Chocolate Protein Cheesecake Variation
For chocolate lovers, these jars can be transformed into a chocolate cheesecake-style dessert by adding cocoa powder to the filling as described in the original variation. The cocoa gives the creamy base a deeper chocolate flavor, while chocolate chips can be scattered over the top for extra texture. This variation works especially well with the buttery biscuit crust because the mild sweetness of the crust balances the more intense cocoa flavor. When preparing a chocolate version, make sure the filling is mixed thoroughly so the cocoa is evenly distributed. A smooth chocolate cheesecake jar can be served with minimal toppings, or it can be finished with chocolate chips, crushed cookies, or another preferred topping. The result is a richer-tasting dessert while maintaining the convenient individual-jar format.
Strawberry Cheesecake Jar Variation
Strawberry cheesecake is a classic combination, and the same flavor profile works beautifully in this jar format. Chopped strawberries can be mixed into the cheesecake filling, while strawberry sauce can be added on top for a stronger fruit flavor. Fresh strawberries also provide a natural contrast to the creamy filling and biscuit base. For the most appealing presentation, some strawberry pieces can be arranged near the top of each jar rather than mixing every piece into the filling. This allows the red fruit to remain visible through the glass. Strawberry cheesecake jars are especially suitable for spring and summer gatherings because the fruit gives the dessert a fresh, colorful appearance without requiring complicated decoration.
Peanut Butter Cheesecake Jar Variation
Adding peanut butter creates a rich, nutty variation for anyone who enjoys the combination of peanut butter and cheesecake. The original recipe suggests adding two tablespoons of peanut butter to the filling. This gives the cheesecake mixture a deeper flavor and a thicker, more luxurious character. Because peanut butter is naturally rich, it pairs well with the tanginess of Greek yogurt and cream cheese. You can keep the topping simple or add crushed nuts for additional texture. The biscuit base also works nicely with peanut butter because its lightly sweet flavor provides a neutral foundation. This variation is particularly appealing when you want a dessert that tastes substantial and satisfying while still being served in a convenient individual portion.
Lemon Cheesecake Jar Variation
For a brighter dessert, the lemon variation is an excellent option. Increasing the lemon juice and adding lemon zest gives the filling a more pronounced citrus flavor. Lemon works particularly well with Greek yogurt because both ingredients have naturally tangy qualities. The result is a refreshing cheesecake jar that feels lighter on the palate than richer chocolate or caramel versions. When preparing this variation, add the lemon gradually and taste the filling before assembly so you can achieve the level of citrus flavor you prefer. Lemon zest should be finely grated so it blends evenly into the filling. This variation is especially attractive when served cold and topped simply, allowing the fresh lemon flavor to remain the main focus.
Cookies-and-Cream Cheesecake Jars
A cookies-and-cream version adds crunchy chocolate cookie pieces to the creamy cheesecake filling. The original recipe suggests mixing crushed chocolate sandwich cookies into the filling. This creates a pleasing contrast between the smooth dairy mixture and small pieces of crunchy cookie. You can also use additional crushed cookies as a topping if desired. Because the filling is already creamy and the crust provides a biscuit layer, the cookies give the dessert a more indulgent character without requiring a complicated preparation. This version can be especially appealing to children and anyone who prefers a familiar chocolate-cookie flavor. For the best texture, avoid crushing the cookies into a completely fine powder; slightly larger pieces provide more noticeable crunch.
How to Adjust the Sweetness
The amount of sweetness in a protein cheesecake can depend on the protein powder, yogurt, and personal preference. Vanilla protein powders can vary widely, with some being naturally much sweeter than others. Honey or maple syrup also contributes sweetness, so tasting the filling before assembling the jars is useful. If you prefer a sweeter cheesecake, the recipe allows additional honey or maple syrup to be added according to taste. If the protein powder is already quite sweet, you may find the existing amount sufficient. The goal is to create a filling that tastes balanced rather than overwhelmingly sweet. The lemon juice also helps prevent the dessert from tasting flat by adding acidity, so sweetness and tang should complement each other.
Why Softened Cream Cheese Matters
Softening the cream cheese is one of the simplest steps that can make a noticeable difference to the final texture. When cream cheese is used straight from the refrigerator, it can remain firm and form small lumps during mixing. These lumps become particularly noticeable once the Greek yogurt and protein powder have been incorporated. Allowing the cream cheese to sit at room temperature for approximately 30 minutes gives it enough time to soften without becoming overly warm. Once softened, it can be beaten into a smooth base before the remaining ingredients are added. This creates the creamy consistency associated with cheesecake and makes the filling easier to pipe or spoon into the jars.
Getting the Right Filling Consistency
The ideal cheesecake filling should be thick, creamy, and spoonable. It should hold its shape reasonably well when placed into the jar but should not be so stiff that it becomes difficult to spread. Protein powder can absorb moisture and make the mixture thicker, so consistency may vary depending on the brand used. If the filling feels excessively thick, the recipe suggests adding one to two tablespoons of milk. Add the milk gradually rather than all at once, mixing after each addition. This makes it easier to stop once the desired texture has been reached. A smooth filling will also make the finished jars more attractive because it can be spread evenly across the crust and topped neatly.
Storage and Meal Prep
Proper storage makes these cheesecake jars especially convenient for meal preparation. Once assembled, they should be covered and kept refrigerated. The recipe states that they can be stored in the refrigerator for up to four days, making them suitable for preparing several portions at once. This can save time during busy weeks because a ready-to-eat dessert or snack is already available. Individual jars also make portioning simple and reduce the need to cut or serve a large dessert. Freezing is possible, although the texture may change slightly after thawing. For the best creamy consistency, refrigeration is the preferred storage method. Always serve the jars chilled, particularly when you want the filling to retain its thick, cheesecake-like texture.
Serving Suggestions for Different Occasions
These cheesecake jars are flexible enough to fit many occasions. For breakfast, a jar can be served with fresh berries for a sweet start to the day. After a workout, the combination of Greek yogurt and protein powder makes the dessert a convenient protein-focused snack. For parties, clear glass jars provide an attractive presentation because guests can see the biscuit and cheesecake layers. During summer gatherings, chilled berry-topped jars make a refreshing dessert that does not require turning on the oven. They can also be served as a simple everyday treat when you want something sweet without preparing a full cheesecake. Because each serving is assembled individually, the recipe is easy to adapt for casual meals and special occasions alike.
Nutritional Benefits of the Main Ingredients
The ingredients in these cheesecake jars contribute several useful nutritional qualities. Greek yogurt and protein powder are the primary sources of protein in the recipe, while low-fat cream cheese contributes additional protein and calcium. Greek yogurt and cream cheese also provide calcium, an important mineral for maintaining healthy bones. The use of individual jars naturally creates a portion-controlled dessert, which can make it easier to enjoy a sweet treat without serving an oversized slice. Honey or maple syrup provides sweetness while allowing the amount of added sweetener to be controlled. It is important to remember that the nutritional profile depends on the exact brands and quantities used, especially the protein powder and toppings. For that reason, nutritional values should be treated as estimates rather than fixed numbers.
Notes for the Best Results
For consistently smooth cheesecake jars, start with softened cream cheese and mix it thoroughly before adding the other ingredients. Use a protein powder with a flavor you enjoy because its taste will be noticeable in the finished dessert. When preparing the crust, make sure the biscuit crumbs are evenly coated with butter and honey or maple syrup. Do not overpack the crust because a lighter layer is easier to scoop. Chill the jars for at least two hours, although overnight refrigeration can provide an even firmer texture. Taste the filling before assembling so you can adjust sweetness if necessary. Finally, remember that toppings are flexible, so choose fresh fruit, nuts, chocolate, caramel, cookies, berry sauce, or whipped cream according to the flavor you want.
Common Questions About High-Protein Cheesecake Jars
A common question is whether these cheesecake jars need to be baked, and the answer is no. They are designed as a no-bake dessert, with refrigeration providing the time needed for the filling and crust to firm. Another common question concerns preparation ahead of time, and these jars are particularly suitable for making in advance because they can remain refrigerated for up to four days. Some people may also wonder whether different toppings can be used, and the recipe provides several choices, including strawberries, blueberries, crushed nuts, chocolate chips, caramel drizzle, crushed cookies, berry sauce, and whipped cream. The filling can also be customized with chocolate, strawberry, peanut butter, lemon, or cookies-and-cream flavors while keeping the basic cheesecake method intact.
High-Protein Cheesecake Jars
Description:
These High-Protein Cheesecake Jars are creamy, easy no-bake cheesecake desserts made with low-fat cream cheese, Greek yogurt, vanilla protein powder, and a simple biscuit crust. Each jar is finished with your choice of fresh fruit, nuts, chocolate chips, caramel, cookies, berry sauce, or whipped cream. They are ideal for healthy desserts, meal prep, breakfast, snacks, or a convenient post-workout treat.
Preparation & Cooking Duration:
Preparation: Approximately 20 minutes
Chilling: At least 2 hours
Total time: Approximately 2 hours 20 minutes
Cooking: No cooking or baking required
Serving:
Makes 4 medium cheesecake jars
Ingredients
For the Crust
- 1 cup crushed graham crackers or digestive biscuits
- 2 tablespoons melted butter
- 1 tablespoon honey or maple syrup
For the Cheesecake Filling
- 1 cup low-fat cream cheese, softened
- 1 ½ cups plain Greek yogurt
- 2 scoops vanilla protein powder
- 3 tablespoons honey or maple syrup
- 1 teaspoon vanilla extract
- 1 tablespoon lemon juice
Toppings
Choose your favorites:
- Fresh strawberries
- Blueberries
- Crushed nuts
- Chocolate chips
- Caramel drizzle
- Crushed cookies
- Berry sauce
- Whipped cream
Equipment Needed
- Mixing bowls
- Hand mixer or whisk
- Measuring cups and spoons
- 4 glass jars or dessert cups
- Spoon or spatula
Step-by-Step Instructions
Prepare the Biscuit Crust
Combine the crushed graham crackers or digestive biscuits, melted butter, and honey or maple syrup in a medium bowl. Stir until the mixture is evenly combined and has the texture of wet sand. Divide the mixture between four medium jars, using about two tablespoons for each. Press the crumbs gently into the bottom of each jar with the back of a spoon. Refrigerate the jars while preparing the cheesecake filling.
Make the Protein Cheesecake Filling
Place the softened low-fat cream cheese in a large bowl and beat until smooth and creamy. Add the plain Greek yogurt, vanilla protein powder, honey or maple syrup, vanilla extract, and lemon juice. Mix until the filling is smooth, thick, and fully combined. If the mixture is too thick, add 1–2 tablespoons of milk to reach a spoonable consistency.
Assemble the Jars
Take the chilled jars from the refrigerator. Spoon or pipe the cheesecake filling evenly over the biscuit crust in each jar. Smooth the surface with a spoon or spatula. Divide the filling as evenly as possible so all four servings have a similar amount.
Add the Toppings
Finish each cheesecake jar with your preferred toppings. Fresh strawberries and blueberries provide a fruity finish, while crushed nuts, chocolate chips, caramel drizzle, crushed cookies, berry sauce, or whipped cream can be used for different flavor combinations.
Chill Before Serving
Refrigerate the assembled cheesecake jars for at least two hours before serving. For the firmest texture and best flavor, allow them to chill overnight. Keep them covered while refrigerated.
Flavor Variations
Chocolate Cheesecake Jar
Add 2 tablespoons cocoa powder to the filling and finish with chocolate chips.
Strawberry Cheesecake Jar
Mix chopped strawberries into the filling and add strawberry sauce on top.
Peanut Butter Cheesecake Jar
Add 2 tablespoons peanut butter to the cheesecake filling for a rich, nutty variation.
Lemon Cheesecake Jar
Increase the lemon juice and add lemon zest for a brighter citrus flavor.
Cookies-and-Cream Cheesecake Jar
Mix crushed chocolate sandwich cookies into the cheesecake filling.
Notes
Use softened cream cheese to achieve the smoothest filling and avoid lumps. Choose a vanilla protein powder with a flavor you already enjoy because it contributes significantly to the taste of the dessert. If the filling is too thick after adding the protein powder, gradually mix in 1–2 tablespoons of milk. Taste the filling before assembling and adjust the honey or maple syrup if you prefer additional sweetness. Refrigeration is essential for developing the proper cheesecake-like consistency, so do not skip the minimum two-hour chilling period. The jars can be stored covered in the refrigerator for up to four days. Freezing is possible, although the texture may change slightly after thawing.
Nutritional Information
Nutritional values will vary depending on the brands of cream cheese, Greek yogurt, protein powder, biscuits, sweetener, and toppings used. The base recipe provides protein primarily from Greek yogurt, low-fat cream cheese, and vanilla protein powder. It also provides calcium from the dairy ingredients. Because the recipe offers several optional toppings, a precise nutritional value per jar cannot be established without specifying the exact products and toppings used. For the most accurate nutrition information, calculate each ingredient using the nutrition labels of the specific products selected and divide the total by four servings.