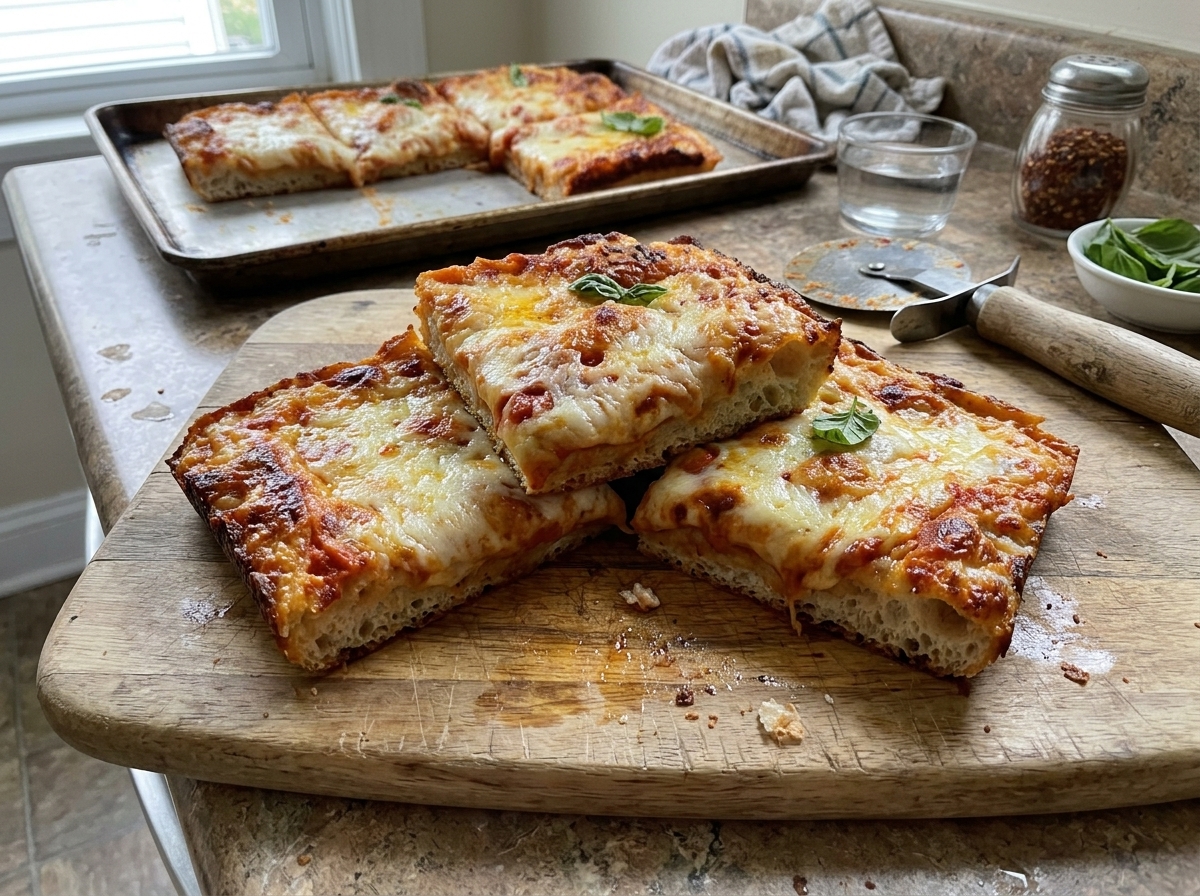
Sourdough Detroit-style pizza combines a thick, airy crust with a soft, chewy center, rich cheese, and beautifully crisp edges. Unlike traditional thin-crust pizza, this homemade version has a substantial base that rises during fermentation and develops a golden bottom as it bakes. The sourdough starter adds a mild tangy flavor that balances the richness of the cheese and tomato sauce, making every square slice satisfying and full of flavor.
One of the best features of this sourdough Detroit-style pizza recipe is its texture. The inside stays light and fluffy, while the bottom becomes wonderfully crisp from the olive oil and pan fat. Cheese spread all the way to the edges melts against the hot sides of the pan, creating a caramelized border that is especially delicious. This combination of textures makes Detroit-style pizza a fantastic choice for homemade pizza night.
Making Detroit pizza with sourdough takes more time than using commercial yeast, but most of that time is spent resting and fermenting the dough. You do not need to knead it extensively or rush through complicated steps. A series of stretch-and-fold movements helps strengthen the dough, while fermentation develops its structure and flavor. Once the dough is ready, adding your favorite toppings and baking the pizza is straightforward.
What Is Detroit-Style Pizza?
Detroit-style pizza is a rectangular, thick-crust pizza known for its airy interior, crisp base, generous cheese topping, and caramelized edges. It originated in Detroit, Michigan, and is traditionally baked in a rectangular metal pan. The shape allows the dough to rise into a thick crust while the cheese reaches the edges and creates the signature crunchy border.
A defining feature of Detroit pizza is the way the cheese interacts with the pan during baking. Rather than stopping the cheese short of the crust, it is spread all the way to the sides. As it melts and browns, it forms a crisp, golden layer around the outside. This contrast between the crunchy cheese edges and the soft sourdough center gives the pizza its distinctive character.
Detroit-style pizza is also often associated with stripes of tomato sauce placed across the top. These lines are sometimes called racing stripes because of their appearance. Although the sauce can be spread over the cheese in different ways, the striped presentation gives the pizza a recognizable look. For this recipe, you can follow the standard sauce-and-cheese method or arrange the toppings to create the traditional striped finish.
Why You Will Love This Sourdough Pizza Recipe
The crust is one of the biggest reasons to make this recipe. It is thick enough to support generous toppings but remains light and fluffy rather than dense. The dough develops strength through repeated stretching and folding, allowing it to hold the air created during fermentation. When baked, these air pockets produce the open crumb that makes a well-made sourdough pizza so enjoyable.
Another advantage is the balanced flavor. Sourdough starter contributes a gentle tang that complements the salty cheese and savory tomato sauce. Because the dough ferments for several hours, its flavor develops gradually without requiring complicated ingredients. This makes the recipe a useful way to turn a regularly maintained sourdough starter into something different from a standard loaf of bread.
The crispy edges are equally appealing. Spreading cheese to the sides of the pan encourages it to melt, brown, and form a crunchy border. Meanwhile, the olive oil and duck fat, beef tallow, or ghee help the bottom crust become golden and crisp. Every piece offers a mixture of soft dough, melted cheese, tangy sauce, and crunchy edges.
This recipe is also flexible enough for different schedules. After the dough completes its main fermentation, you can refrigerate it for a second rise of up to 24 hours. That option allows you to prepare the dough in advance and bake the pizza when you are ready to serve it. You can also adjust the toppings to suit your preferences while keeping the original dough method.
Tips for the Best Sourdough Detroit Pizza
Use an Active Starter
A bubbly, recently fed sourdough starter is essential for reliable fermentation. If your starter is sluggish, the dough may take much longer to rise and may not develop the airy texture expected from Detroit-style pizza. Feed your starter ahead of time and use it when it shows clear signs of activity. Since fermentation depends on starter strength and room temperature, judge readiness by the dough’s appearance as well as the time elapsed.
Measure Ingredients by Weight
Weighing the flour, water, starter, and salt helps you repeat the recipe successfully. Cup measurements can vary depending on how flour is packed, while a kitchen scale provides more consistent quantities. Accurate measurements are particularly important when working with sourdough because hydration influences how easily the dough stretches, how it ferments, and how airy the final crust becomes.
Do Not Worry About the Oil in the Pan
The olive oil may appear excessive when the dough first goes into the pan, and some oil may collect along the sides as the dough spreads. This is expected in this recipe. The oil helps create the distinctive crisp underside that separates Detroit-style pizza from softer pan pizzas. Avoid draining it away before baking, because it contributes to the intended texture.
Push the Cheese to the Edges
For a recognizable Detroit-style crust, make sure the cheese reaches the sides of the pan. Cheese that stops short of the edges cannot form the same caramelized border. Use enough cheese to cover the surface generously, while keeping the toppings distributed evenly. The combination of melted cheese and direct contact with the hot pan produces the crispy, browned edges that many people enjoy most.
Cover the Pizza During the First Stage of Baking
The initial 15 minutes under foil help retain moisture and support the dough’s oven rise. Removing the foil for the final 13 to 15 minutes allows the cheese to brown and the crust to develop its finished texture. Follow both stages rather than baking uncovered from the beginning, because the covered phase is part of the method used to achieve a soft interior and crisp exterior.
Storage and Reheating Instructions
How to Store Leftover Pizza
Allow leftover sourdough Detroit-style pizza to cool to room temperature, then place it in an airtight container in the refrigerator. It can be stored for up to four days. For longer storage, wrap individual cooled slices in freezer paper and place them in a freezer-safe zip-top bag. Frozen slices can be kept for up to two months for the best quality.
Label the freezer bag with the date so you can keep track of storage time. When you plan to eat frozen pizza, thaw it in the refrigerator overnight before reheating. Store the slices promptly after they have cooled rather than leaving them at room temperature for an extended period. Proper storage helps preserve the flavor and makes leftover pizza convenient for quick lunches or dinners.
How to Reheat Pizza in a Skillet
A covered skillet is an excellent way to reheat Detroit-style pizza while maintaining its crispy bottom. Place one or more slices in a large skillet over low to medium-low heat, then cover with a lid or aluminum foil. Warm the pizza for approximately 10 to 15 minutes, checking that the base does not become too dark. The gentle heat crisps the bottom while the trapped warmth helps the cheese melt.
How to Reheat Pizza in the Oven
If you prefer to reheat several slices at once, preheat the oven to 350°F. Place the pizza on a baking tray, cover it with foil, and warm it for about 15 minutes. Check the center before serving to ensure it is heated through. The oven is convenient for multiple portions, while the skillet is particularly useful when you want to restore the crisp texture of individual slices.
Frequently Asked Questions
Is Detroit-Style Pizza Dough the Same as Focaccia?
No. Both can have an airy interior and a dimpled surface, but they are prepared and finished differently. This sourdough Detroit pizza uses a thick dough that ferments in an oiled rectangular pan, then receives generous cheese and pizza sauce. Its defining features include a crisp bottom and caramelized cheese edges, which are not standard characteristics of every focaccia recipe.
What Cheese Is Best for Detroit-Style Pizza?
Mozzarella is a reliable choice because it melts well and creates a stretchy topping. Whole-milk mozzarella is especially suitable, and combining it with mild white cheddar can produce a flavor closer to traditional brick cheese. Wisconsin brick cheese is another option if you can find it. Whichever cheese you choose, spread it to the edges so it can caramelize against the sides of the pan.
Should the Sauce Go Under or Over the Cheese?
Both arrangements can work. Spreading sauce over the dough before adding cheese is a straightforward method and is used in this recipe. For a more traditional racing-stripe appearance, spread the cheese directly over the dough and add the sauce in lines across the top. The choice mainly affects presentation and the distribution of sauce rather than the basic fermentation process.
Can I Prepare the Dough a Day Ahead?
Yes. Once bulk fermentation is complete, cover the pan and refrigerate the dough for up to 24 hours. A cold proof of at least three hours is recommended, but the second rise is optional. This makes the recipe easier to plan around a busy schedule, because you can complete the dough preparation earlier and bake the pizza later.
Sourdough Crust Detroit Style Pizza
This sourdough Detroit-style pizza features a thick, fluffy, and chewy crust with a crispy golden bottom, gooey mozzarella cheese, tangy pizza sauce, and delicious caramelized cheese edges.
6
servings20
minutes30
minutes549
kcal50
minutesIngredients
- For the Sourdough Crust
112 g active sourdough starter (100% hydration, fed and bubbly)
297 g filtered water, at room temperature
9 g fine sea salt
395 g unbleached bread flour
1 tablespoon duck fat, beef tallow, or ghee, for greasing the pan
2 tablespoons extra-virgin olive oil, plus more for oiling your hands
- For the Toppings
3/4 cup pizza sauce
1 pound freshly shredded mozzarella cheese
Directions
- Mix the Dough:
Add the sourdough starter, water, and salt to a large bowl. Whisk to combine, then mix in the bread flour until a rough dough forms. Cover and rest for 30 minutes. - Stretch and Fold:
Perform one set of stretch and folds. Cover the dough and rest for 30 minutes. Repeat three more times, allowing 30 minutes between each set. - Prepare the Pan:
Grease the bottom and sides of a 9 × 13 × 2.25-inch pan with duck fat, beef tallow, or ghee. Add two tablespoons of olive oil to the bottom. - Ferment the Dough:
Transfer the dough to the prepared pan after the fourth stretch and fold. Cover and leave at room temperature until doubled, bubbly, and jiggly, approximately four hours at 74°F. - Cold Proof (Optional):
Cover and refrigerate the dough for up to 24 hours. A cold proof of at least three hours is recommended. - Preheat the Oven:
Position a rack in the bottom third of the oven and preheat to 450°F. Shred the mozzarella cheese. - Add the Toppings:
Oil your fingers and gently dimple the dough, spreading it toward the edges of the pan. Add the pizza sauce and mozzarella, making sure the cheese reaches the sides. - Bake Covered:
Cover the pan with aluminum foil and bake for 15 minutes. - Bake Uncovered:
Remove the foil and bake for another 13–15 minutes, until the cheese is browned in spots and the crust is golden and crisp. - Cool and Serve:
Let the pizza rest in the pan for 10 minutes. Carefully transfer it to a cutting board, cut into six slices, and serve warm.
Notes
- Use an active, bubbly sourdough starter for the best rise.
- The fermentation time may vary depending on the temperature of your kitchen.
- Do not remove the olive oil from the pan; it helps create the crispy bottom crust.
- For classic Detroit-style racing stripes, spread the cheese over the dough first and spoon the sauce in lines across the top.
- Store cooled leftovers in an airtight container in the refrigerator for up to four days.
- Freeze individually wrapped slices for up to two months. Thaw overnight in the refrigerator before reheating.
- For the crispiest reheated slices, warm them in a covered skillet over low to medium-low heat for 10–15 minutes.
Nutrition Facts
- Calories: 549kcal
- Fat: 25g
- Carbohydrates: 55g
- Fiber: 2g
- Sugar: 2g
- Protein: 25g