Making a sourdough starter from scratch is a simple baking project that requires just two ingredients: flour and water. Over time, these ingredients develop a living culture of wild yeast and beneficial bacteria that can naturally ferment bread dough, create a distinctive tangy flavor, and help homemade loaves rise without commercial yeast. Although the ingredient list is short, building a healthy sourdough starter takes patience, regular feeding, and careful observation. A new starter may become bubbly within a few days, but it usually needs around two weeks of consistent care before it is ready for baking. This guide explains how to make sourdough starter at home, how to feed it, what changes to expect during fermentation, and how to recognize a mature culture. Whether you are new to sourdough baking or preparing to make your first homemade loaf, this step-by-step method will help you understand the process from beginning to end.
Why Make Your Own Sourdough Starter?
A homemade sourdough starter gives you a natural leavening ingredient that can be maintained for months or even years with proper care. Unlike bread recipes that depend on packaged yeast, sourdough bread relies on the wild microorganisms that develop in a mixture of flour and water. These organisms consume available sugars, produce gas, and help bread dough expand during fermentation. The starter also develops organic acids that contribute to sourdough’s familiar flavor and aroma. One of the biggest advantages of making your own starter is the control it gives you over your baking routine. You can adjust feeding times, experiment with different flours, and develop a culture that suits your preferred bread style. Although the first two weeks require regular attention, maintaining an established starter is much easier. Once it becomes reliably active, you can use it for sandwich bread, crusty artisan loaves, rolls, and many other sourdough recipes.
Understanding How Sourdough Starter Works
A sourdough starter is a fermented mixture of flour and water containing wild yeast and lactic acid bacteria. These microorganisms develop and multiply as the mixture is refreshed with new flour and water. Wild yeast produces carbon dioxide, which creates bubbles and helps bread dough rise, while bacteria contribute acidity and flavor. The culture develops gradually, so its appearance and smell can change significantly during the first two weeks. You may notice bubbles on the surface, a rise in volume, a pleasantly fermented aroma, or periods when the mixture appears inactive. These changes are normal parts of starter development, and activity does not always increase steadily from one day to the next. Temperature, flour type, water quality, feeding frequency, and the amount of starter retained all influence fermentation. Learning to recognize these factors is more useful than following a rigid calendar alone. A successful sourdough starter is one that shows consistent, repeatable activity rather than simply producing a few bubbles.
Ingredients Needed for a Sourdough Starter
The recipe uses 600 grams of unbleached all-purpose flour, bread flour, whole-grain flour, or a combination of these options, together with 600 grams of bottled, filtered, or dechlorinated water. You will use small portions of these ingredients for individual feedings rather than mixing the entire quantity together on the first day. All-purpose flour is a convenient starting point because it is easy to find and generally produces a manageable consistency. Bread flour can also work well, while whole-wheat and rye flours bring additional minerals and nutrients that may encourage fermentation. If you choose a flour blend, keep a record of the proportions so you can repeat the same mixture during future feedings. Water is equally important because strongly chlorinated water may interfere with fermentation in some circumstances. Filtered or bottled water is a practical option when tap water has a strong chlorine smell. Measuring the ingredients with a digital kitchen scale gives the most consistent results, especially when working with the small quantities required during the first days.
Choosing the Best Flour for Homemade Sourdough
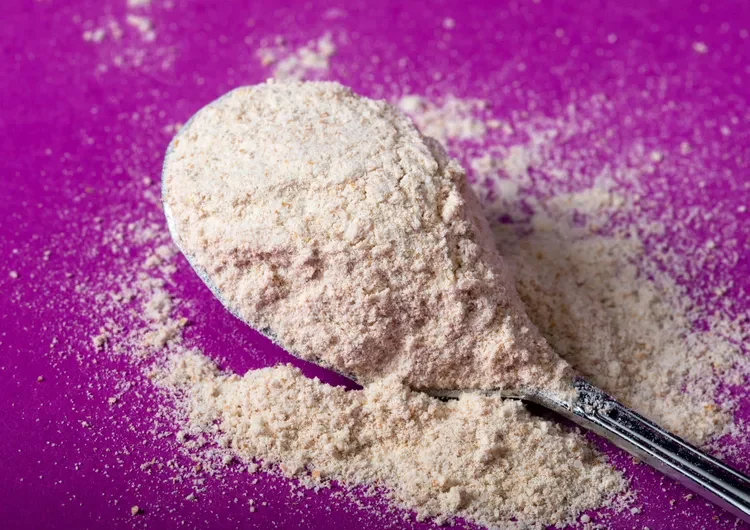
The type of flour you choose can affect how quickly your sourdough starter becomes active, how it smells, and how it looks after feeding. Unbleached all-purpose flour is suitable for beginners because it creates a relatively smooth mixture and is widely available. Bread flour contains more protein, although protein content alone does not determine how active a starter becomes. Whole-wheat flour includes more of the grain’s outer layers and germ, while rye flour is rich in nutrients and often encourages visible fermentation. Some bakers begin with whole-grain flour and later switch to all-purpose flour, while others use a blend throughout the process. Both approaches can work. If you change flour types during the first two weeks, do so thoughtfully and note the change because the starter’s consistency and fermentation speed may also change. Whichever option you select, use fresh flour without signs of moisture damage or spoilage. A consistent flour choice makes it easier to judge whether the culture is becoming stronger over time.
Selecting Water and Preparing Clean Equipment
Good equipment helps make sourdough starter maintenance easier and more predictable. Two clean glass jars with a capacity of approximately eight ounces each are useful because you can transfer the culture into a fresh container during feeding. A small rubber spatula or spoon makes it easy to mix the flour and water thoroughly. A kitchen scale is particularly valuable because small differences in ingredient quantities can affect feeding ratios. Before beginning, wash the jars with hot, soapy water and rinse them well. You may also use a dishwasher or another suitable method to sanitize the containers. Allow the equipment to drain and remain clean before adding ingredients. Use a lid that can rest loosely on the jar or another suitable cover that protects the mixture while allowing the container to remain unsealed. Avoid closing the jar tightly during active fermentation because gas needs room to escape. Keep the jars in a location where you can observe the culture and maintain a reasonably stable temperature.
The Ideal Temperature for Sourdough Fermentation
Temperature plays an important role in developing a healthy sourdough starter. A comfortable room temperature of approximately 70–80°F (21–27°C) is a useful range for this recipe. In a warmer environment, fermentation may happen faster, while cooler conditions can slow the culture’s development. This is why two starters made with the same flour and water may show different levels of activity on the same day. Place the jar away from direct sunlight, heating appliances, and cold drafts. Avoid setting it on a very warm surface, as excessive heat can damage the microorganisms responsible for fermentation. If your kitchen becomes cooler overnight, the starter may need additional time to rise after feeding. Rather than assuming that the culture has failed because it is developing slowly, observe its bubbles, aroma, texture, and rise over several days. Maintaining a reasonably consistent temperature helps you establish a predictable feeding routine and makes it easier to recognize when your homemade sourdough starter is becoming mature.
Day 1: Mixing Flour and Water
Begin by washing and thoroughly rinsing your first jar. Weigh 10 grams of flour and 10 grams of water, then combine them in the container. Stir with a small spatula until there are no dry pockets of flour remaining. The mixture should resemble a thick paste, although its exact consistency depends on the flour you use. Wipe any residue from the inside walls of the jar above the mixture, making it easier to observe future growth. Cover the container loosely and place it somewhere with a temperature between 70 and 80°F (21–27°C). Leave it undisturbed for approximately 48 hours before the next scheduled feeding. You may not see any bubbles during the first day, and the mixture may look almost unchanged. This is not a reason to add extra flour or water. The microorganisms need time to establish themselves, so allow the initial mixture to develop before beginning regular refreshments.
Day 2: Allowing the Starter to Develop
During the second day, leave the starter in its warm, stable location and avoid unnecessary stirring or feeding. The mixture may begin to smell slightly earthy, grainy, or fermented, but noticeable changes are not guaranteed this early. Some starters develop small bubbles quickly, while others remain quiet for several days. Early activity can also be misleading because the first wave of microbial activity does not necessarily mean the culture is mature enough to raise bread. Keep the jar loosely covered and check that the surface has not dried out. Do not add extra flour simply because the starter appears inactive. Flour and water need time to support the development of a balanced microbial community, and frequent changes to the routine can make the process harder to assess. Patience is particularly important at this stage. The goal is not to produce a large volume of starter immediately, but to create the conditions in which a stable, repeatable fermentation culture can develop.
Day 3: Starting the Regular Feeding Routine
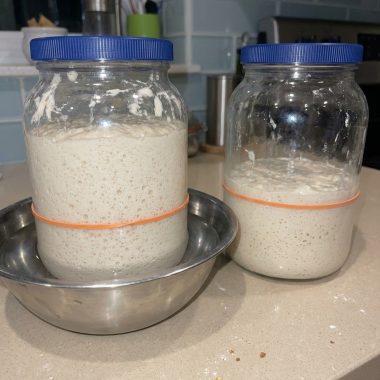
On the morning of the third day, transfer 10 grams of the existing mixture into a second clean jar. Add 10 grams of flour and 10 grams of water, then stir until the ingredients are evenly combined. This is called a 1:1:1 feeding ratio because the starter, flour, and water are measured in equal weights. Discard the remaining mixture rather than adding all of it to the refreshed culture. Keeping a small portion reduces waste and prevents the quantity of starter from increasing unnecessarily with every feeding. Mark the starting level on the outside of the jar with a rubber band or a removable marker. This simple technique makes it easier to see whether the culture rises after feeding. Return the jar to its usual location and observe any bubbles, changes in texture, or differences in aroma. From this point forward, regular refreshments will help provide fresh nutrients and gradually establish a more dependable sourdough culture.
Days 4–7: Feeding Twice Daily
From the fourth day through the seventh day, feed the starter twice daily, once in the morning and once in the evening, using a 1:1:1 ratio. For each feeding, retain 10 grams of starter and mix it with 10 grams of flour and 10 grams of water. Transfer the mixture into a clean jar when appropriate, and discard the portion that is not needed. During these days, watch for changes in the starter’s height, surface bubbles, texture, and smell. It may rise and fall, become thinner, or develop a sharper aroma as fermentation progresses. You might also experience a period of strong activity followed by a quieter phase. This temporary slowdown is not unusual in a developing starter. Keep your measurements consistent and avoid changing the feeding ratio simply because the culture has a few quiet hours. By recording your observations twice daily, you can begin to understand how temperature and feeding times affect its behavior.
Days 8–9: Increasing the Feeding Ratio
On the morning of day eight, continue with a final 1:1:1 feeding by combining 10 grams of starter with 10 grams of flour and 10 grams of water. In the evening, begin using a 1:2:2 ratio: retain 8 grams of starter and add 16 grams of flour and 16 grams of water. This change gives the culture more fresh food in relation to the amount of starter being carried forward. Continue the 1:2:2 ratio for both morning and evening feedings on day nine. Each time, measure the quantities carefully, mix thoroughly, and mark the starting height so you can assess the rise. If the starter has begun rising and falling predictably and smells pleasantly fermented, you can start saving suitable discard in a separate container in the refrigerator for recipes that specifically use sourdough discard. However, a starter that is only a few days old should not be considered mature simply because it has produced bubbles. Consistent performance remains the most useful sign of progress.
Days 10–12: Building a Stronger Sourdough Culture
Continue feeding twice daily at a 1:2:2 ratio throughout days ten, eleven, and twelve. Each feeding uses 8 grams of starter, 16 grams of flour, and 16 grams of water. At this point, you may notice more regular bubbles, a clearer rise after feeding, and an aroma that resembles fermented fruit, yogurt, or mildly sour dough. The starter may also become more elastic or show a network of bubbles when you stir it. These are encouraging signs, but individual cultures develop at different speeds. A cool kitchen or a flour change can slow progress, while a warm environment may shorten the time between feeding and peak activity. Keep using clean equipment, measuring accurately, and observing the starter rather than relying only on the calendar. If it rises quickly and then collapses before the next feeding, it may be consuming its available food rapidly. Recording when the rise begins and when the starter starts falling will help you adjust your routine when necessary.
Days 13–14: Moving to a Higher Feeding Ratio
On the morning of day thirteen, reduce the retained starter to 5 grams and add 15 grams of flour and 15 grams of water. This is a 1:3:3 ratio by weight. Repeat the same feeding in the evening and continue twice daily through day fourteen. Some instructions express this stage as approximately 1:4:4 when using rounded ounce measurements, but weighing the ingredients in grams gives you a consistent 1:3:3 ratio. This higher feeding ratio supplies more fresh flour and water relative to the amount of existing starter. Continue marking the jar after each refreshment and compare its rise over the following hours. A mature starter should show increasingly reliable activity, but it may need more than fourteen days, especially if the kitchen is cool or the culture develops slowly. Do not force the starter into a new ratio or baking schedule simply to meet a deadline. The objective is to develop a stable culture that can repeatedly ferment dough, not merely to complete a fourteen-day checklist.
How to Know When Your Sourdough Starter Is Ready
A mature sourdough starter should rise consistently after feeding, show bubbles throughout the mixture, and develop a recognizable fermented aroma. For this schedule, a useful readiness benchmark is a starter that reliably triples in volume within approximately twelve hours after feeding over several consecutive days. The precise timing depends on temperature, flour, hydration, and feeding ratio, so consider the full pattern rather than one isolated rise. A starter that rises substantially but then collapses may still be active; the collapse simply indicates that it has passed its peak. The best time to use it for bread depends on the recipe and the starter’s behavior after feeding. If it barely rises, has inconsistent activity, or takes much longer than expected to expand, continue feeding and monitoring it. Smell and appearance are helpful indicators, but neither alone proves that the culture is ready. A repeatable rise-and-fall pattern is more dependable than bubbles appearing during the first few days.
Common Sourdough Starter Problems and How to Address Them
A new sourdough starter can appear unpredictable, particularly during its first week. If it produces bubbles early and then becomes quiet, continue the scheduled feedings and allow time for the culture to stabilize. If the mixture looks watery, first check whether it has separated or whether the flour naturally produces a thinner consistency. Stirring thoroughly and measuring by weight can help maintain consistency. If the starter rises and falls before the next feeding, it may need attention to feeding timing rather than simply more frequent stirring. An unpleasant, sharply fermented smell can occur during development, but visible mold or unusual colored growth should never be ignored. Discard a starter that shows mold or pink, orange, or other suspicious discoloration, and clean the equipment before beginning again. Do not attempt to rescue a moldy starter by scraping off the surface. Keeping a record of temperature, flour choice, feeding quantities, and rise times can help you identify the cause of ordinary fermentation changes without making unnecessary adjustments.
Feeding Ratios Explained for Beginners
Sourdough feeding ratios describe the relative weights of starter, flour, and water. In a 1:1:1 ratio, each component weighs the same, so 10 grams of starter receives 10 grams of flour and 10 grams of water. A 1:2:2 ratio means that every gram of starter receives two grams of flour and two grams of water. Similarly, a 1:3:3 ratio provides three times as much flour and water as the retained starter. Increasing the ratio generally gives the culture more fresh food and can lengthen the time it takes to reach peak activity, although temperature and flour choice also influence the result. Ratios are measured by weight, not volume, which is why a kitchen scale is preferable to measuring cups. Following a consistent ratio makes it easier to compare one feeding with another and understand how the starter responds. As your experience grows, you can adjust the ratio according to your baking schedule and the speed at which your starter consumes its food.
A Practical Fourteen-Day Sourdough Starter Feeding Schedule
The following schedule summarizes the progression from the initial mixture to the higher feeding ratio used near the end of the second week. Treat it as a starting guide rather than a strict timetable because fermentation does not follow identical patterns in every kitchen. On days one and two, leave the original mixture undisturbed for approximately 48 hours. On day three, begin a 1:1:1 feeding, and from days four through seven, feed twice daily at that same ratio. On the morning of day eight, repeat the 1:1:1 feeding before moving to 1:2:2 in the evening. Maintain 1:2:2 twice daily from days nine through twelve, then move to 1:3:3 twice daily from day thirteen onward. Keep notes about bubbles, height, smell, and how long the starter takes to rise. If the culture needs additional time, continue the appropriate feeding routine until its activity becomes consistent.
Storing and Maintaining Your Sourdough Starter
Once your starter is mature, the feeding schedule can be adjusted to fit how frequently you bake. If you bake regularly and keep the starter at room temperature, it generally needs regular refreshments to maintain its strength. If you bake less often, refrigeration can slow fermentation and reduce the frequency of feeding required. Before storing the culture, make sure the container is clean and has enough room for expansion. Use a lid that is appropriate for the storage conditions, and avoid leaving a tightly sealed container of actively fermenting starter at room temperature for extended periods. When you want to bake after refrigeration, feed the starter and allow it to become active again according to its behavior and your recipe. A refrigerated starter may need one or more refreshments before it reliably rises. Keep a small amount of culture rather than maintaining a large jar unnecessarily, especially if you want to reduce discard. Regular observation, sensible storage, and consistent feeding help preserve a useful starter for future loaves.
Using Sourdough Discard in Other Recipes
Sourdough discard is the portion removed from a starter during feeding. Once the culture is established and behaving normally, suitable discard can be collected in a separate container and refrigerated for use in recipes designed for it. Pancakes, crackers, waffles, muffins, and some quick breads are common ways to use discard instead of throwing it away. Its flavor and acidity can vary depending on the starter’s age, flour, and storage conditions, so results may differ from one batch to another. Remember that discard is not always a substitute for an active starter in a bread recipe because it may not have enough leavening strength to raise dough on its own. Follow a recipe that specifically accounts for discard and its contribution to the mixture. For safety, do not save material that shows mold, unusual discoloration, or signs of spoilage. Reducing waste is useful, but keeping the starter healthy and handling it properly should always come first.
Notes for Making a Successful Sourdough Starter
- Use a kitchen scale: Weigh flour, water, and starter in grams for accurate feeding ratios.
- Keep the temperature steady: Aim for approximately 70–80°F (21–27°C) throughout the initial development period.
- Mark the jar: A rubber band or removable marker helps you track how much the starter rises after feeding.
- Use clean containers: Wash jars and utensils thoroughly before use, and transfer the culture to a clean jar when needed.
- Do not rush fermentation: Fourteen days is a useful guide, not a guarantee that every starter will mature within that time.
- Watch for warning signs: Discard a starter that develops mold or suspicious pink or orange discoloration.
- Save discard thoughtfully: Once the culture is established, suitable discard can be refrigerated for recipes that call for it.
- Keep a feeding journal: Record feeding times, ratios, temperature, aroma, and rise patterns to make future maintenance easier.
Frequently Asked Questions About Homemade Sourdough Starter
Can I make sourdough starter with all-purpose flour?
Yes. Unbleached all-purpose flour is a suitable choice for making sourdough starter from scratch. Whole-wheat flour, rye flour, and bread flour can also be used, either individually or in a blend. Different flours may produce different fermentation speeds and consistencies, so keep your flour choice consistent while learning how your starter behaves.
How long does it take to make sourdough starter?
This method follows a fourteen-day schedule, but some starters mature sooner while others require additional time. Look for a culture that rises consistently after feeding and develops a predictable fermentation pattern over several days. The starter’s actual activity is more important than reaching a particular day on the calendar.
Why is my starter bubbly but not rising?
Bubbles indicate that fermentation is occurring, but they do not necessarily mean the culture is strong enough to raise bread dough. A starter may also be too thin to hold gas effectively or may rise and fall between observations. Continue feeding consistently, mark the starting level, and observe the rise over time.
Do I have to feed my starter twice a day?
Twice-daily feeding is the routine used in this initial fourteen-day method after the first two days. However, the best schedule depends on temperature, feeding ratio, and fermentation speed. Once the starter is established, you can adapt its maintenance schedule to your baking habits and storage conditions.
What does a healthy sourdough starter smell like?
A developing starter may smell mildly sour, fruity, yeasty, or similar to fermented dough. The aroma often changes as the culture matures. An unpleasant smell alone does not always establish that a starter is unsafe, but visible mold or suspicious pink or orange discoloration means you should discard it rather than attempt to repair it.
Can I use my starter before day fourteen?
You can assess its activity before day fourteen, but early bubbles or a single rise do not guarantee that it is mature enough for bread baking. For this method, wait until the starter reliably triples in volume within about twelve hours after feeding over several consecutive days. If it is not performing consistently, continue feeding it.
Homemade Sourdough Starter from Scratch
Description: Learn how to make a natural sourdough starter with flour and water. This beginner-friendly method includes a fourteen-day feeding schedule, practical fermentation guidance, and instructions for developing a reliable starter for homemade sourdough bread.
Preparation & Cooking Duration
- Preparation Time: 1 hour
- Fermentation Time: 14 days
- Total Time: 14 days and 1 hour
Serving / Yield
Makes a sourdough starter that can be maintained and refreshed for future baking. The amount available for a particular loaf depends on your feeding routine and the recipe you plan to make.
Ingredients
- 600 g (21 oz) unbleached all-purpose flour, bread flour, or whole-grain flour, such as whole-wheat or rye flour, or a combination of these
- 600 g (21 oz) bottled, filtered, or dechlorinated water
Step-by-Step Instructions
- Day 1 — Mix the initial starter: Clean an eight-ounce glass jar thoroughly. Combine 10 g (⅓ oz) flour with 10 g (⅓ oz) water and stir until smooth. Cover loosely and leave at 70–80°F (21–27°C) for approximately 48 hours.
- Day 2 — Allow fermentation to begin: Leave the mixture undisturbed in its usual location. Check for early bubbles or changes in aroma without adding extra ingredients.
- Day 3 — Begin feeding: Transfer 10 g (⅓ oz) starter into a clean jar. Add 10 g (⅓ oz) flour and 10 g (⅓ oz) water. Mix thoroughly and discard the remaining starter.
- Day 4 — Feed twice: Repeat the 1:1:1 feeding in the morning and evening, using 10 g starter, 10 g flour, and 10 g water each time.
- Days 5–7 — Continue the routine: Feed twice daily at a 1:1:1 ratio. Observe the starter’s height, bubbles, texture, and aroma after each feeding.
- Day 8 — Increase the food supply: Feed at 1:1:1 in the morning. In the evening, retain 8 g (¼ oz) starter and add 16 g (½ oz) flour and 16 g (½ oz) water, establishing a 1:2:2 ratio.
- Days 9–12 — Maintain the 1:2:2 ratio: Continue twice-daily feedings with 8 g starter, 16 g flour, and 16 g water. Mark the starter’s starting level to monitor its rise.
- Days 13–14 — Move to 1:3:3: Retain 5 g (⅛ oz) starter and mix with 15 g (½ oz) flour and 15 g (½ oz) water. Repeat the feeding morning and evening.
- Day 14 and beyond — Check maturity: Continue the same feeding routine. The starter is considered mature for this method when it reliably triples in volume within approximately twelve hours after feeding over several consecutive days.
- Maintain for future baking: Once mature, keep the starter at room temperature with regular feedings or refrigerate it if you bake less frequently. Refresh it as needed before using it in a bread recipe.
Nutritional Information
Traditional sourdough starter is a fermented mixture rather than a fixed serving of food. Nutritional values per serving are not provided because they depend on the flour used, fermentation, feeding history, and quantity consumed. The nutritional content of bread made with the starter will depend on the complete bread recipe.